• Free shipping
  • 5-year warranty
  • Fast delivery

How do you soundproof a music room for drums?

Soundproofing a music room for drums is one of the most challenging tasks in home soundproofing. Drums not only produce powerful airborne sound that travels through walls, doors, and ceilings, but also distinct vibrations that travel through floors, joists, and other structural elements. Therefore, a drum room needs to be planned with greater precision than many other rooms where you want to reduce disruptive noise.

The most important thing is to distinguish between soundproofing and sound absorption. When you soundproof, you’re trying to stop sound from leaving the room or penetrating into other parts of the home. Sound absorption, on the other hand, is primarily about reducing echo and reverberation within the same room. In a music room for drums, sound absorption is sometimes mentioned to explain the difference, but if the goal is to protect other rooms from loud drum sounds, the focus must be on the construction and on the path of the sound as it leaves the room.

Drum sounds pose significant challenges because multiple issues arise simultaneously. The bass drum and stands put stress on the floor and can generate structure-borne sound that travels far into the building. Snare drums, tom-toms, and cymbals force air against walls, doors, and ceilings with high energy. If the room has lightweight partition walls, thin doors, or gaps that aren’t sealed, the sound will often take the easiest route out. Even small gaps around door frames, thresholds, electrical outlets, and pipe penetrations can have a greater impact than many people realize.

To succeed, you therefore need to work in several layers. First, you must find the most obvious leaks and seal them. Next, you need to examine how the walls, ceilings, and floors are constructed and whether they have sufficient mass to dampen airborne sound. Finally, you need to reduce the contact between vibrations and the building, especially under the drum set and at other points where impact energy is transmitted into the structure.

In practice, this often means you need to reinforce weak areas rather than simply adding material where it’s easy. A heavy wall solution is less effective if the door still leaks sound, and a sealed door leaf is less effective if the floor transmits vibrations to the adjacent room. Therefore, soundproofing works best when planned as a whole, where doors, walls, ceilings, floors, and joints are treated together.

How far you need to go depends on the building’s construction, how often you play, what time of day the room is used, and how sensitive the adjacent rooms are. In some cases, clear improvements to sealing, the door, and the floor are sufficient. In other cases, heavier layers, more isolated solutions, or a separate structure within the existing room are required. The harder and more frequently the drums are played, the more important it becomes to address both airborne sound and structure-borne transmission simultaneously.

A well-planned music room for drums should therefore not only feel better to play in, but above all reduce the amount of sound that disturbs other rooms in the home or building. When the right measures are combined in the right places, the result is often significantly better than if you focus solely on a single wall or isolated spot treatments.

Recommended products

Benefits of Soundproofing a Music Room for Drums

Less noise leakage to other rooms
Proper sound insulation helps reduce the amount of drum noise that travels through walls, ceilings, floors, and doors.

Less structure-borne noise in the building
When vibrations are better dampened, the risk of impacts and shocks propagating through the building’s structure is reduced.

Better control over weak points
By sealing gaps and treating joints, it becomes easier to address the areas where sound would otherwise escape.

More consistent results from floor to ceiling
A well-thought-out comprehensive solution ensures that the insulation works not just in a single part of the room but throughout the entire structure.

Better conditions for practicing at home
When disturbances are reduced, it becomes easier to use the music room more regularly without affecting the surroundings as much.

Reduced stress on doors and openings
Additional sealing around doors, thresholds, and openings makes a big difference in rooms where sound pressure is high.

Stronger protection against hard impulse sounds
Drums produce fast and powerful sound peaks, and heavier and denser solutions help withstand these better.

A better foundation for future improvements
When a room is initially built with proper sound insulation, it becomes easier to add further measures later without having to start from scratch.

Recommended categories

Soundproofing – Blocks sound between rooms – Wall

Here you'll find products and solutions for walls where drum sounds tend to echo.

Soundproofing – Blocks sound between rooms – Ceiling

Here you'll find materials for ceilings where sound and vibrations might otherwise be transmitted upward or to the sides.

Soundproofing – Blocks sound between rooms – Flooring

Here you'll find flooring solutions designed to absorb impacts, shocks, and vibrations.

Vibration damping – Reduces vibrations

Here you'll find solutions that help reduce vibrations that affect overall sound insulation.

Step-by-step: How to effectively soundproof a music room for drums

A drum room needs to be treated as a complete structure where multiple sound paths are blocked simultaneously. Therefore, don’t start by randomly installing materials; instead, work methodically on sound leakage, mass, and vibration transmission. When you follow the steps in the correct order, the result will be both clearer and more durable.

Step 1: Map out how sound leaves the room
Start by identifying where the sound is currently traveling. Listen in adjacent rooms, in the room above or below, as well as at doors, wall junctions, and the floor. Note whether it is primarily hard impact sounds, muffled bass, or vibrations in the structure that are perceived as most disruptive.

Step 1.1
Pay special attention to door panels, frames, thresholds, ventilation openings, electrical outlets, and pipe penetrations. These points often act as weak links even when the walls otherwise feel stable.

Step 1.2
Also assess whether the floor seems to transmit impacts from the bass drum, pedal, and stand. In drum rooms, this is often a bigger part of the problem than one might initially think.

Results
You’ll get a clearer picture of whether the main problem lies in air leaks, lightweight construction, structure-borne noise, or a combination of several factors.

Step 2: Seal all openings before continuing
The next step is to stop unnecessary sound leakage. Even small gaps around doors, door frames, and penetrations can let out more sound than large surfaces where the structure is otherwise sealed.

Step 2.1
Seal gaps around door frames and other joints where air can pass through. If the door has a noticeable gap at the floor, this must also be addressed to prevent an open sound path out of the room.

Step 2.2
Inspect ventilation openings, cable runs, and outlets. If these are left unsealed, improvements to walls and ceilings will be less effective than they otherwise could be.

Step 2.3
Check that the door actually closes tightly when shut. A lightweight interior door may often need to be reinforced or replaced if the goal is effective sound insulation against loud drumming.

Result
The room gains a tighter foundation where sound cannot escape as easily through gaps, doorways, and other small but critical leakage points.

Step 3: Improve walls and ceilings with more mass and the right construction
Once the room is more airtight, the walls and ceiling need to better withstand the airborne sound pressure from the drums. Here, soundproofing involves making the structure heavier and less permeable.

Step 3.1
Assess whether existing walls are lightweight or thin. If so, additional layers may be needed to increase mass and reduce how easily they are set in motion by drum sounds.

Step 3.2
Pay close attention to the connections between the wall, ceiling, and floor. If new layers are installed without checking the edges and penetrations, sound can still bypass the measure via flanking transmission.

Step 3.3
If the ceiling borders a bedroom, living room, or other sensitive areas, you often need to give the ceiling the same attention as the walls. Drum sounds do not travel only straight ahead, but also upward and into adjacent building elements.

Result
Walls and ceilings become better at dampening airborne sound, which reduces how much snare, cymbal, and other hard impacts carry into surrounding rooms.

Step 4: Reduce structure-borne transmission from the drum set to the floor
In a drum room, it’s not enough to just work on the walls and ceiling. The drum set itself can transmit significant energy directly into the floor, especially through the bass drum, pedals, and stands.

Step 4.1
Create a more dampened structure beneath the drum set so that impacts aren’t transmitted as strongly into the joists or floor slab. The more direct contact that’s broken, the less structure-borne noise the surrounding rooms will receive.

Step 4.2
Ensure that peripheral equipment such as stands, stools, and other hard points of contact with the floor are also addressed. In many cases, it is the sum of several small contact points that causes vibrations to spread.

Step 4.3
If the room is located on an upper floor or in a lightweight construction, the floor should be given extra priority, as structure-borne noise often becomes very noticeable in adjacent parts of the building.

Result
Impact energy from the drum set is better dampened before it reaches the building, which reduces vibrations and muffled disturbances in rooms adjacent to, above, or below the music room.

Step 5: Check the overall situation and address the weakest point
Once the basic measures are complete, the room needs to be tested again. Play at a normal volume and listen in adjacent spaces to hear what still stands out.

Step 5.1
If the sound is now mainly heard at the door, the door area needs further improvement. If, instead, it is most noticeable in the floor or wall joints, you should direct your next action there.

Step 5.2
Proceed step by step rather than doing everything at once. Once you know which part remains the weakest, you’ll have better control over both the results and the cost.

Result
You’ll build a more effective and well-thought-out soundproofing system where each new step targets the part of the music room that still lets the most sound through.

Did you know that…

It’s often not the largest wall that first gives away a drum room, but the gap under the door. A small air leak can act as an unexpectedly effective sound channel when the sound pressure inside the room is high.

Many people feel that drums can be heard “throughout the entire house,” but what sounds farthest away is often not the same sound as in the room. Instead, it may be vibrations that have found their way into the building and appear in places completely different from what one would expect.

A bass drum can create more disturbance in a room beneath the floor than in the room next to the wall. This is because the impact energy tends to take the stiffest path through the structure, not always the shortest one.

Two rooms can sound almost equally loud when you stand in them, yet disturb the surroundings to very different degrees. The difference often lies in details such as airtightness, connections, and how well the floors, walls, and ceilings dampen vibrations between building components.

Selected articles on "How do you soundproof a music room for drums?"

How do you soundproof a floor?

How do you build a soundproof stage?

How do you soundproof a ceiling?

How do you soundproof a wall?

Products suitable for soundproofing music rooms for drums

Below are products designed to reduce sound leakage and structure-borne sound transmission in a drum room. The focus is on sealing weak spots, increasing resistance to airborne sound, and dampening vibrations that would otherwise spread throughout the building.

Sound Insulation - SilentDirect MLV
This product is ideal when you want to increase the mass of a structure and block airborne sound from drums that would otherwise travel through walls, ceilings, or other building components.

Sound Insulation - SilentDirect Neo
This product is ideal when you want to reduce vibrations, resonances, and mechanical noise in areas of the music room where structure-borne transmission needs to be dampened.

Soundproofing Damping Mat - SilentDirect Polaric
This product is ideal when you want to dampen vibrations and sheet metal-related resonances on hard surfaces that can otherwise amplify disruptive noise in the structure.

Sealing strip for windows & doors - SilentDirect Seal 20 meters
This product is ideal for sealing gaps around doors, door frames, and other openings where drum sounds easily leak into adjacent rooms.

Sealing strip for door bottom - SilentDirect Seal Door
This product is ideal for reducing sound leakage at the bottom of the door, where an open gap often becomes a clear weak point in the music room.

Sound insulation - SilentDirect Egg
This product is ideal when you want to combine sound insulation and damping in structures where both hard sounds and mechanical impact need to be addressed in a more robust manner.

How do you soundproof a music room for drums?

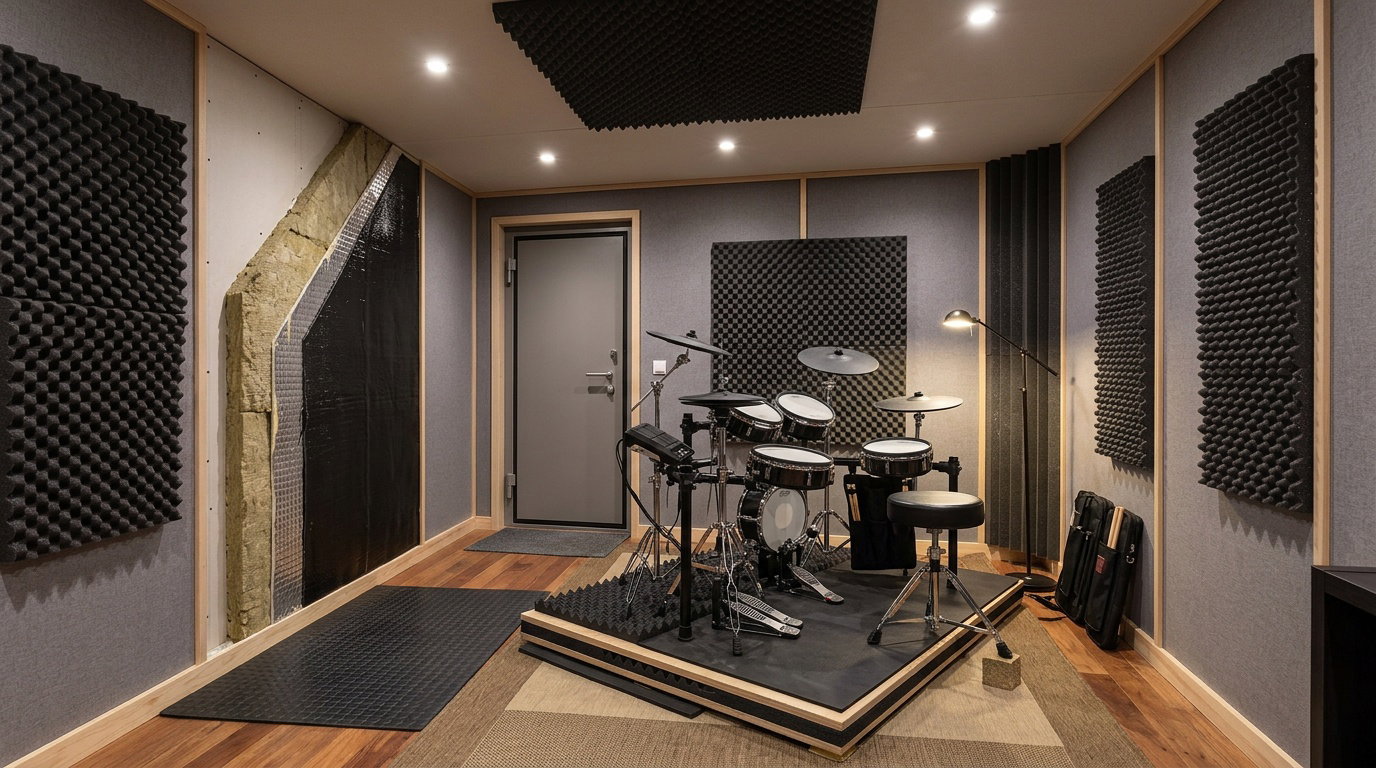
Soundproofing a music room for drums involves reducing the amount of impact noise, airborne sound, and vibrations that travel to walls, floors, ceilings, and adjacent rooms. Drums are one of the most challenging instruments to manage because the bass drum, snare drum, cymbals, and hard strikes all create strong sound peaks and distinct vibrations in the structure. Therefore, a single measure is rarely enough if the goal is to truly reduce disturbances to the surrounding area.

Why drums are difficult to soundproof

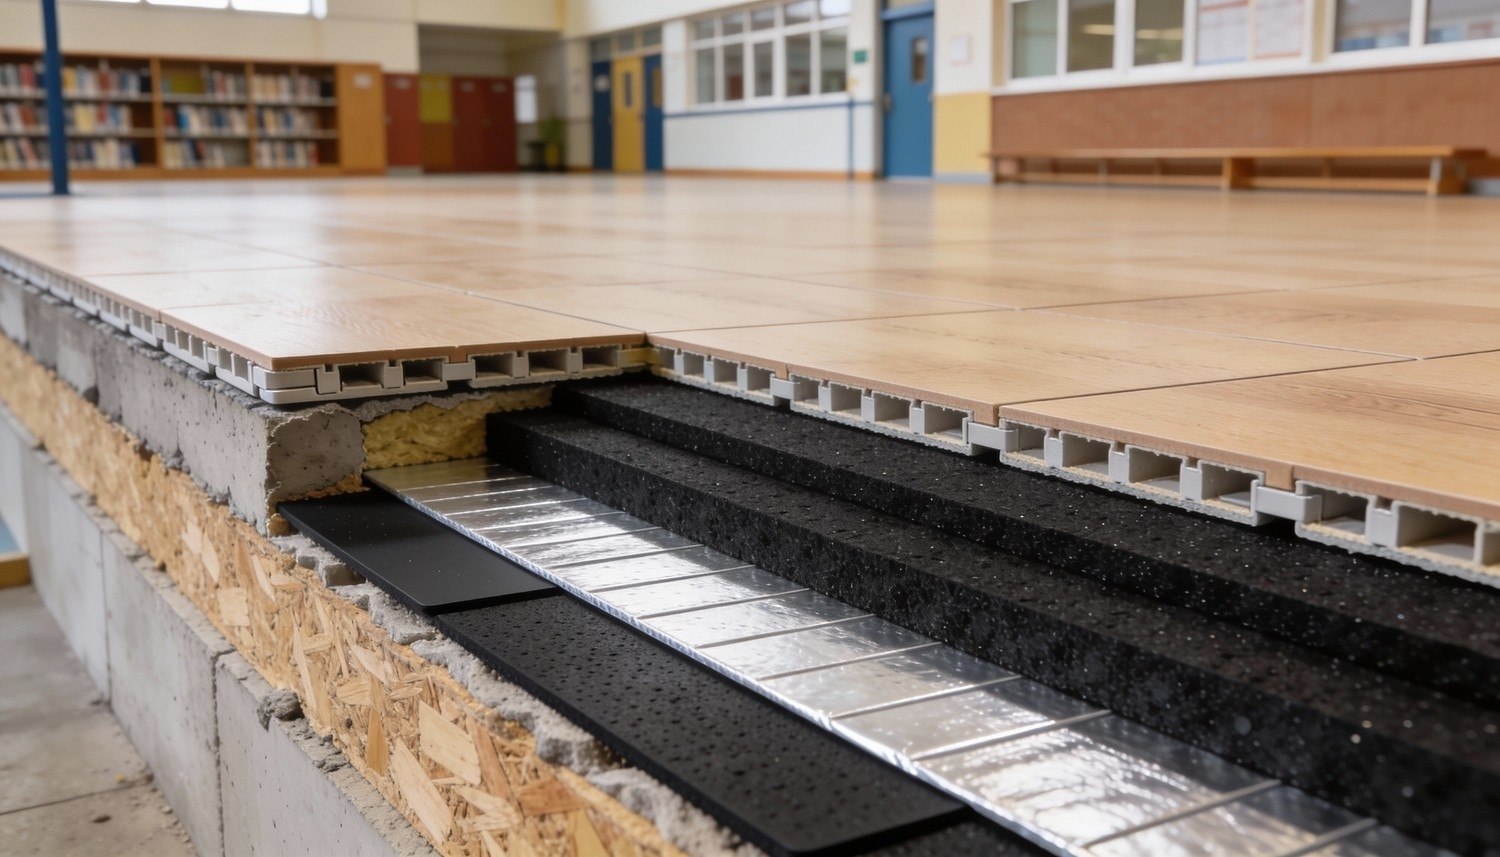
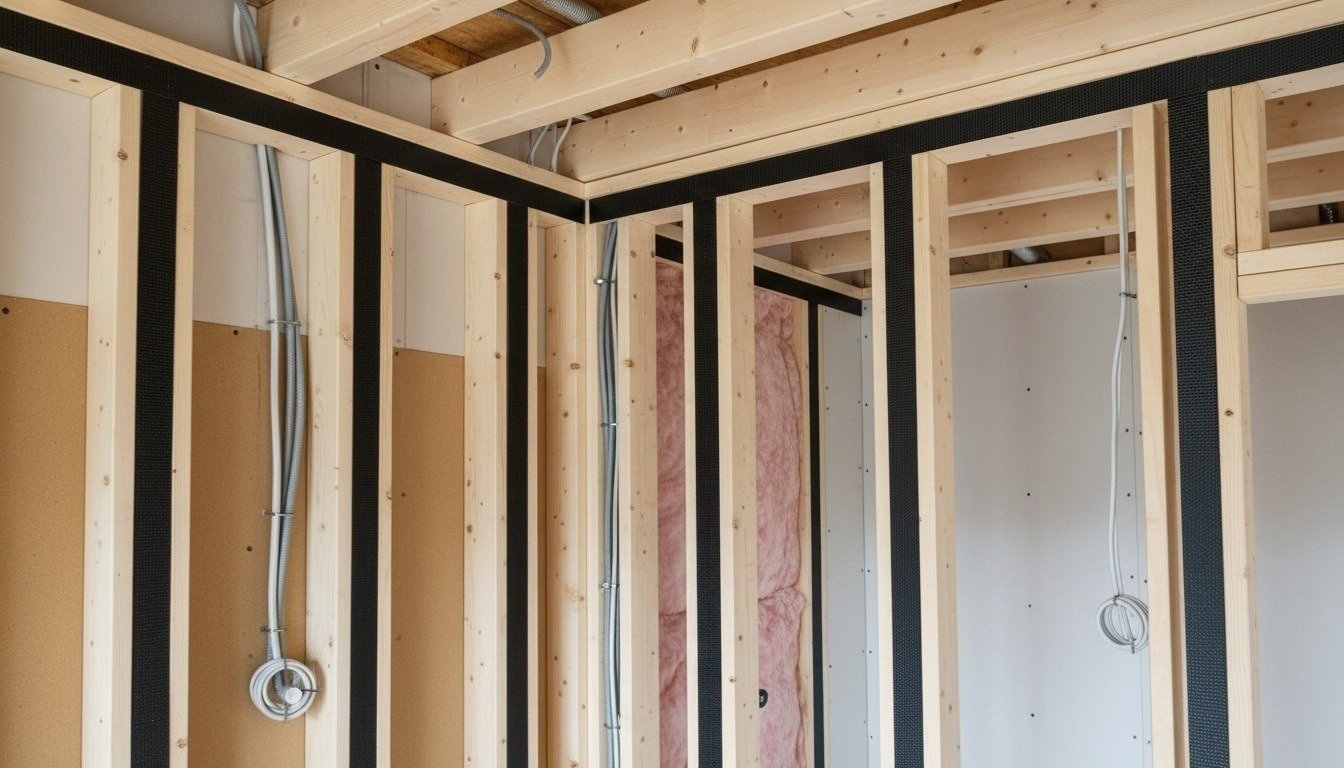
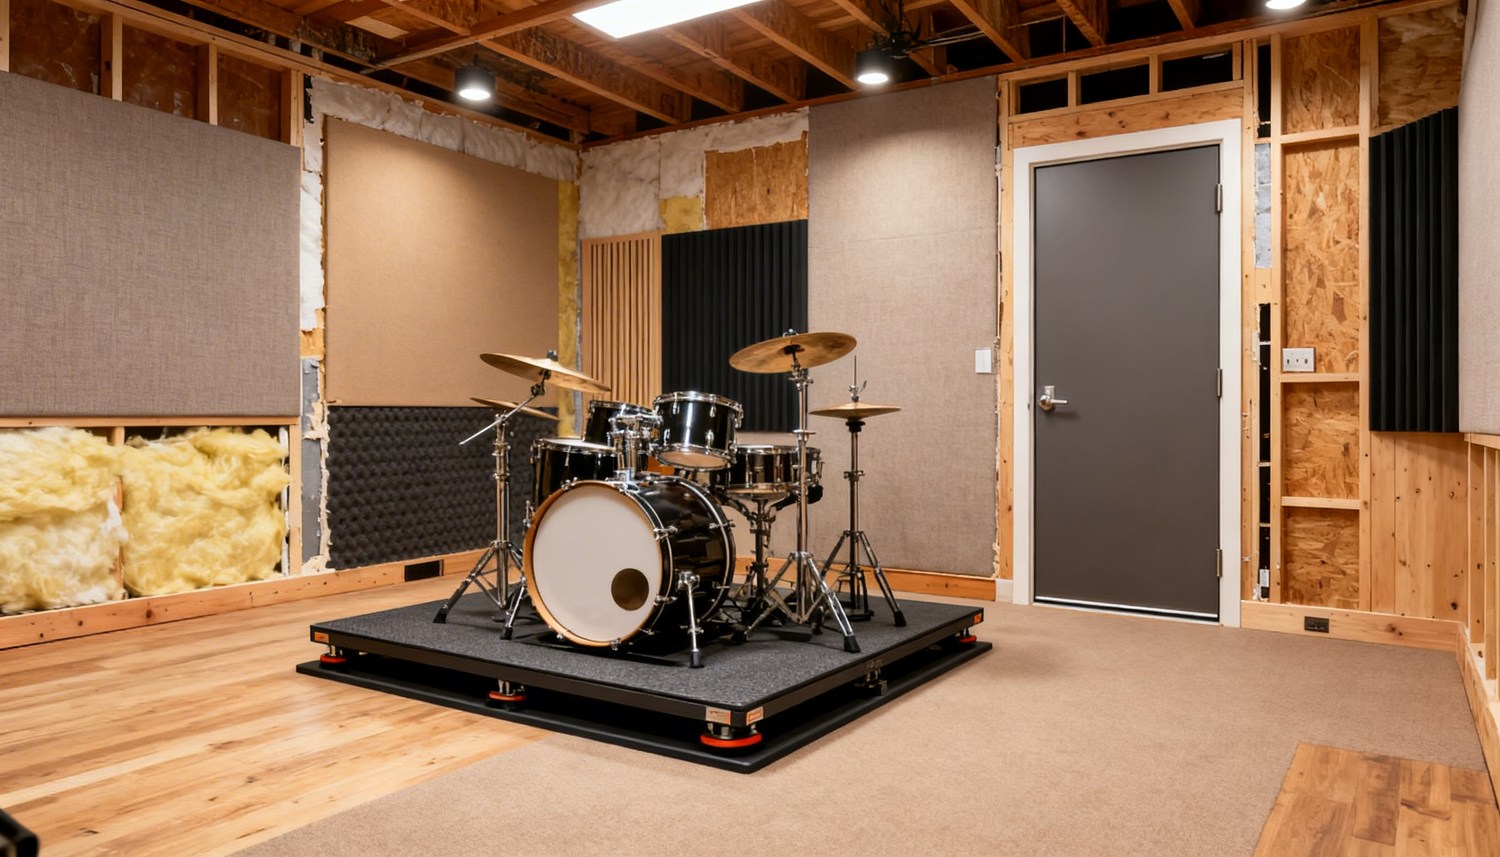
Drum sounds propagate in two ways simultaneously. First, the sound travels through the air and attempts to escape through doors, gaps, walls, ceilings, and ventilation. Second, vibrations are generated that travel through floors, joists, and other building components. When a drum set is placed directly on a hard floor, structure-borne sound often becomes a major part of the problem, especially in homes, rehearsal spaces, basements, and rooms where others are nearby.

The most important aspect of an effective solution

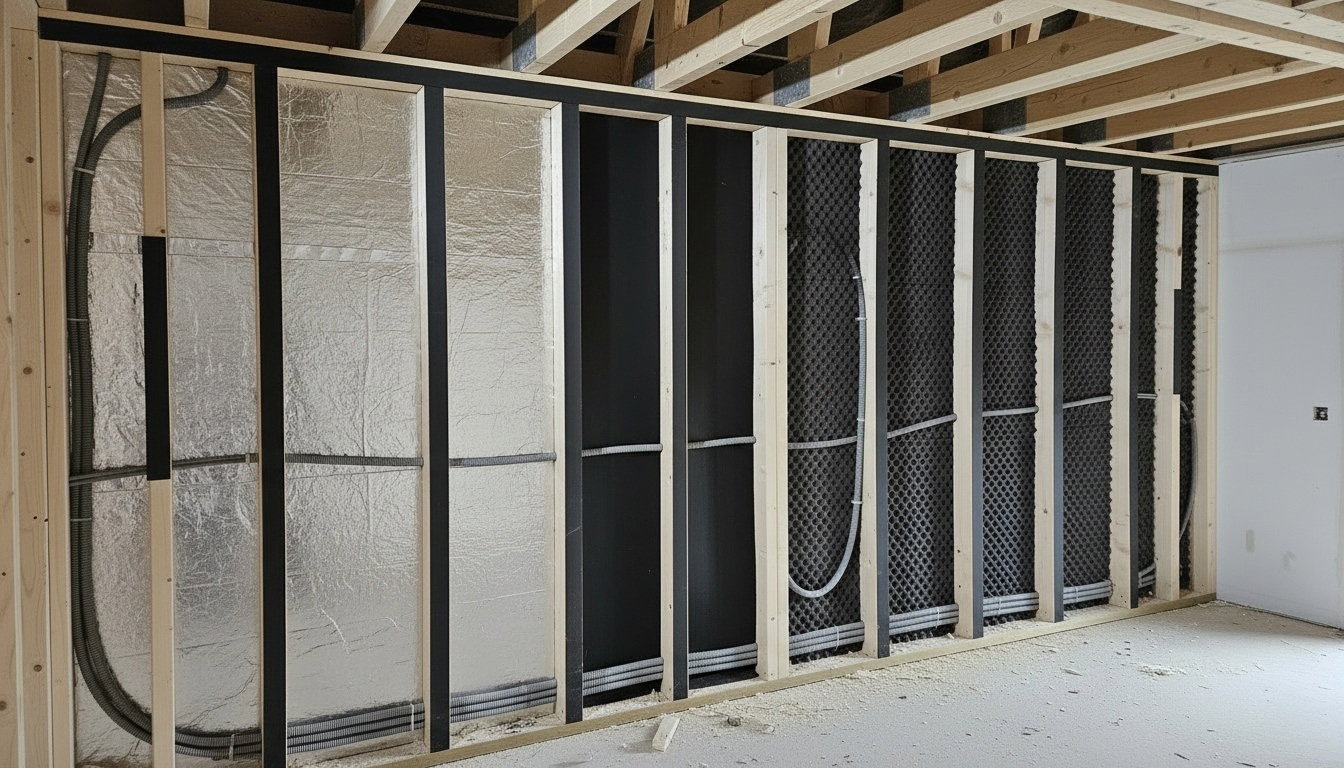
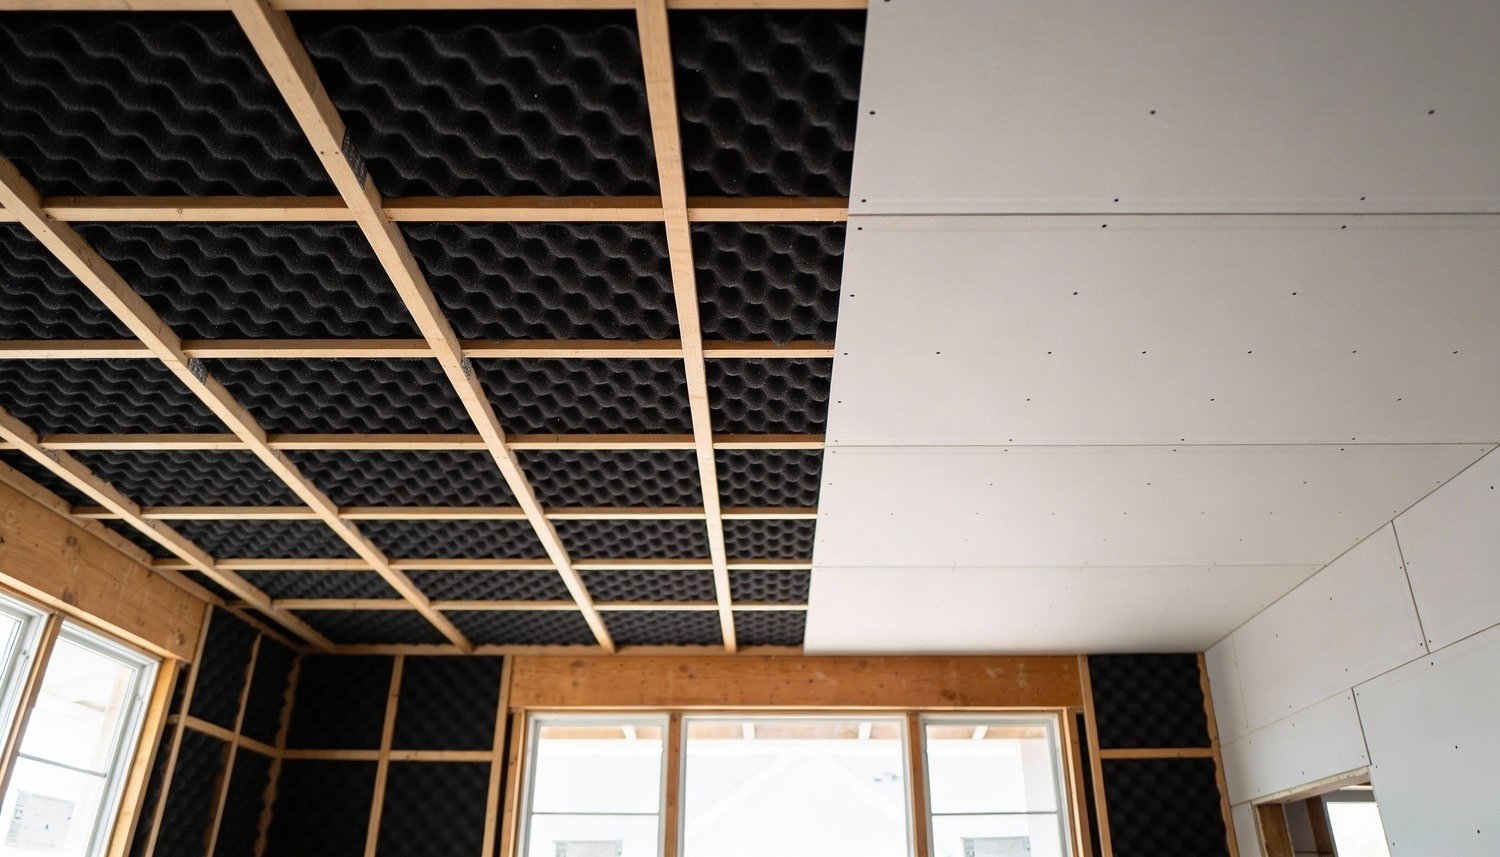
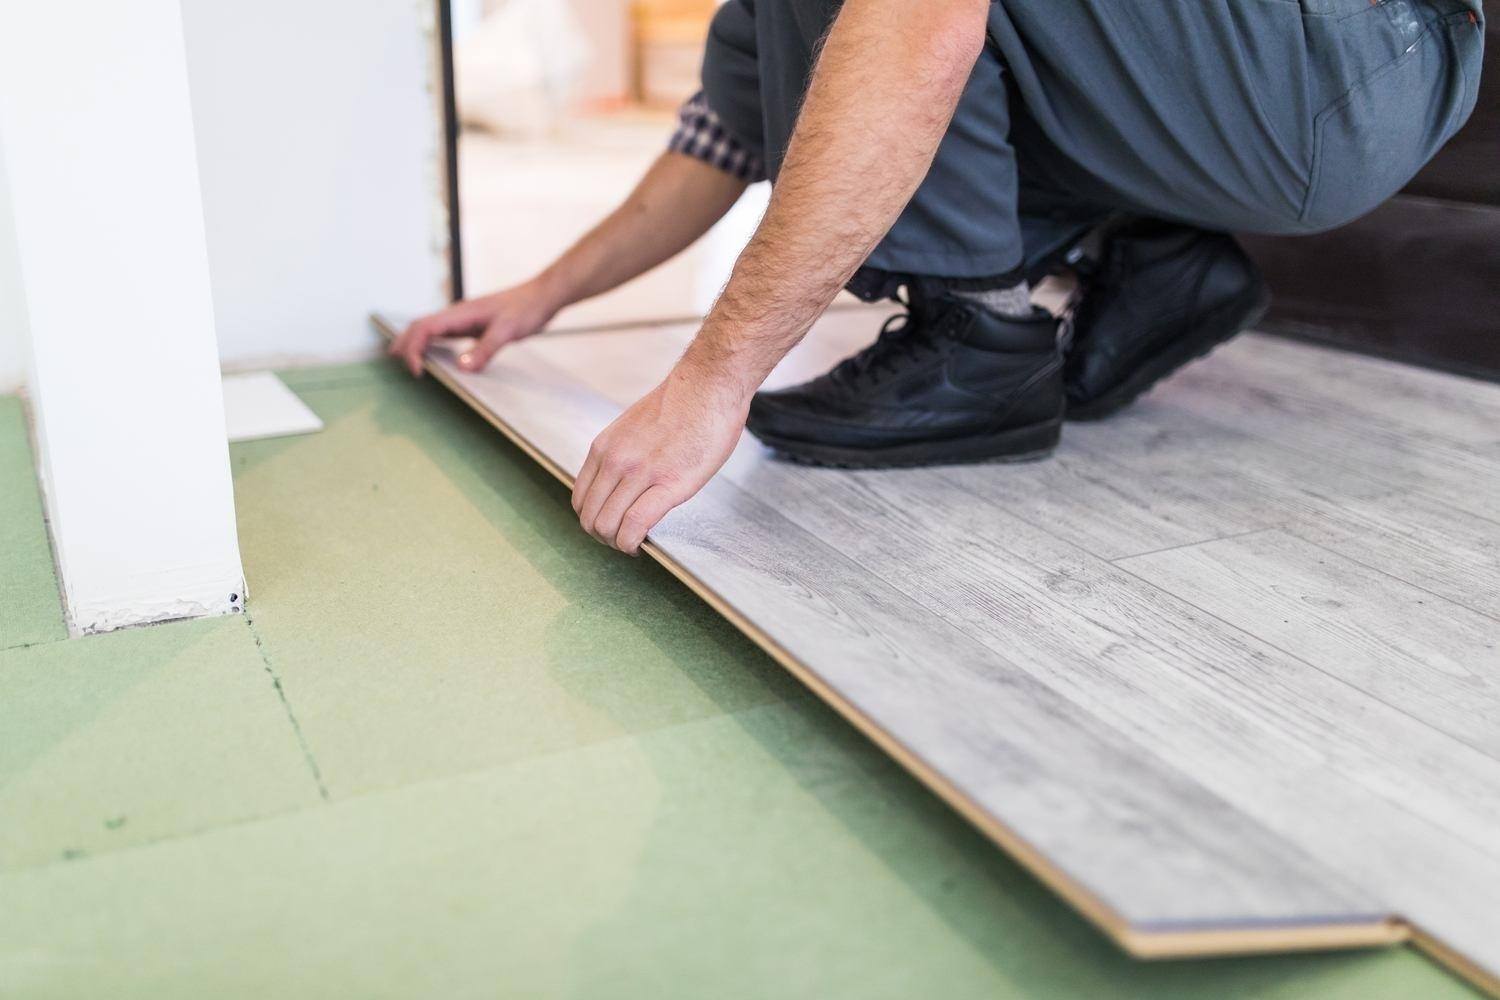
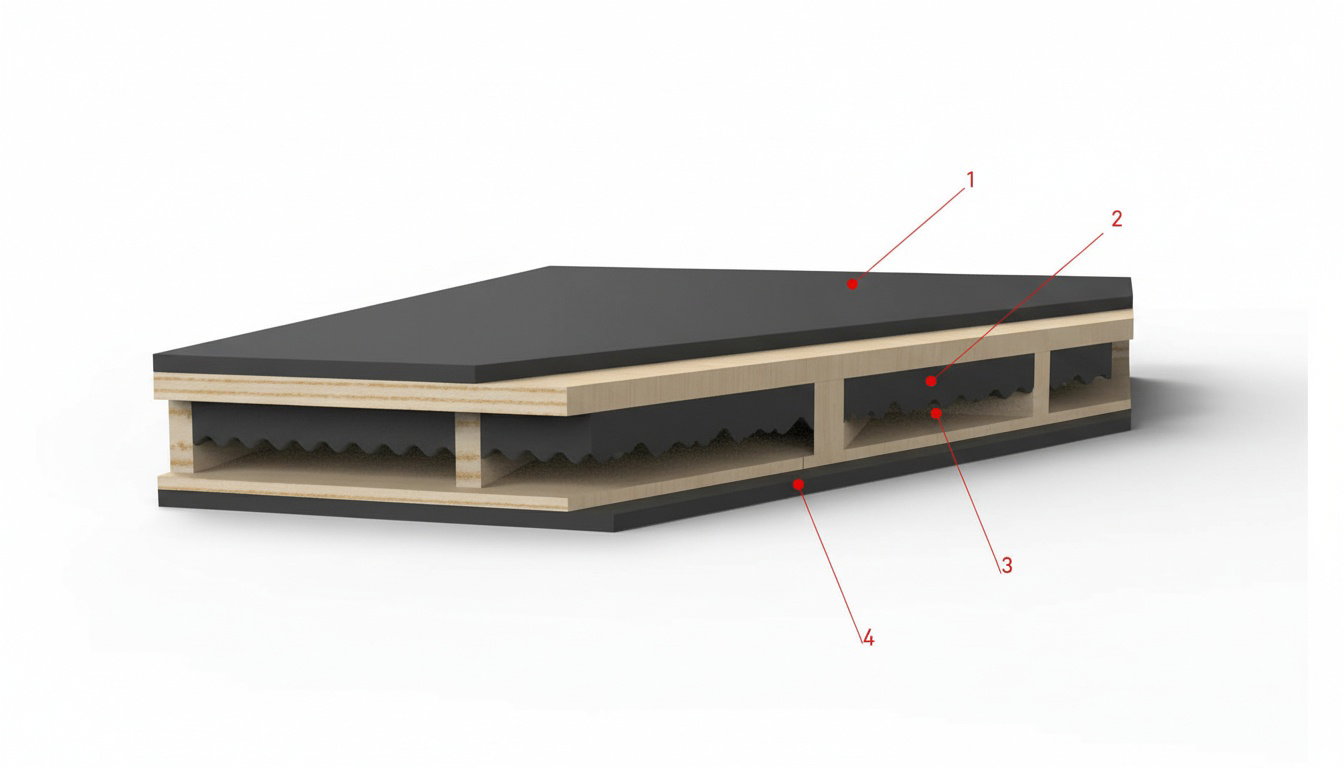
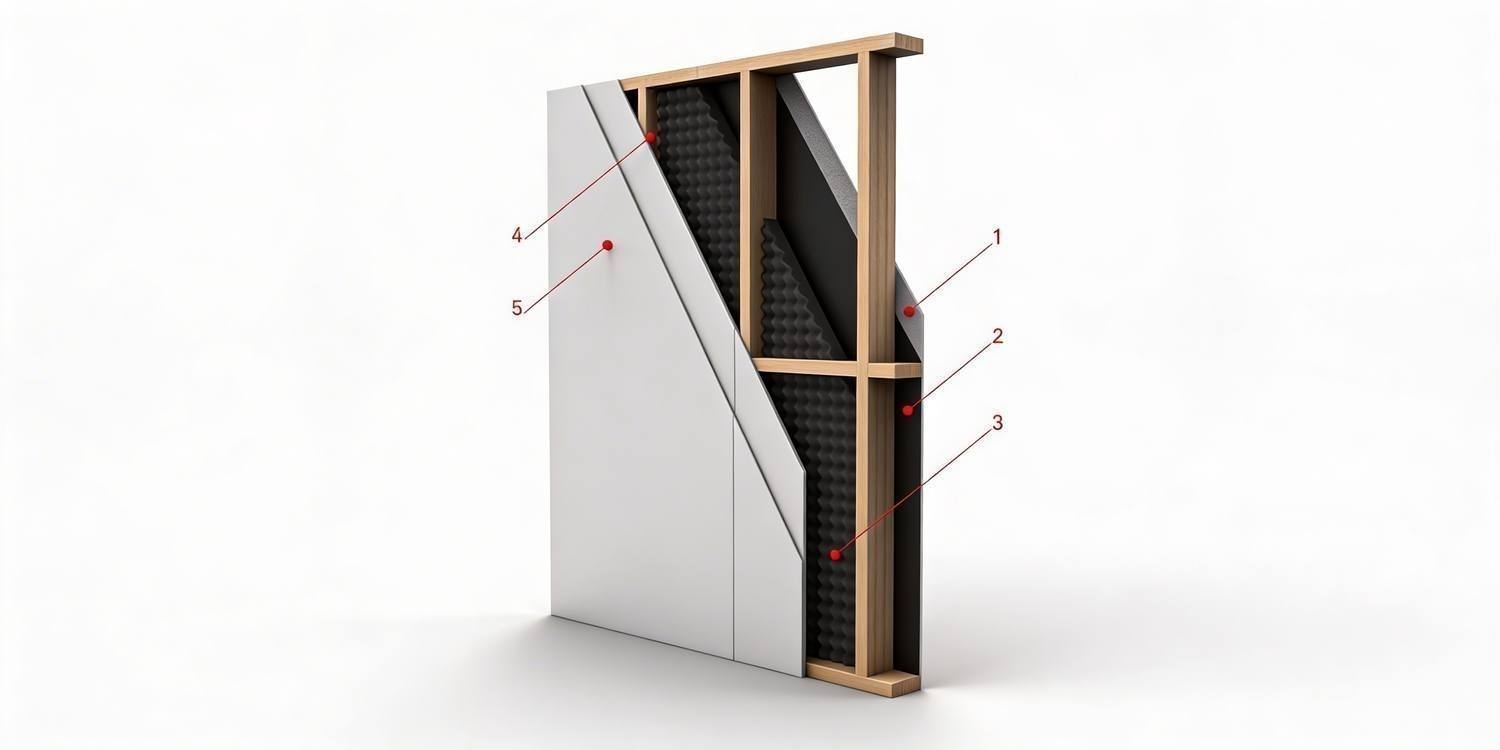
An effective solution is usually based on several elements working together: sealing gaps, adding more mass to walls or doors, vibration damping under or around the drum set, and reducing contact between the sound-producing part of the room and the load-bearing structure. The goal is to block the sound’s path. The fewer direct transmission paths there are, the better the result.

Common weak points in music rooms

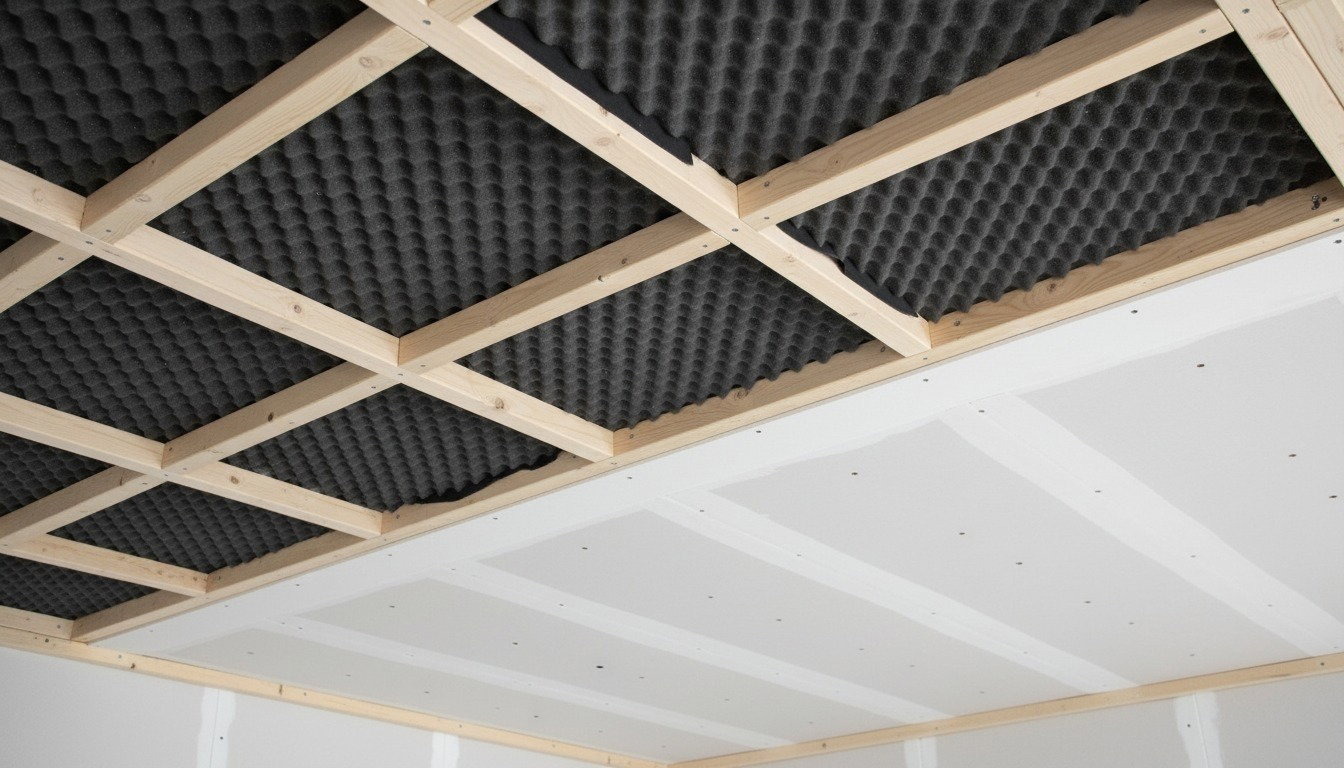
The most common leakage points in a music room for drums are door panels, door gaps, thin wall construction, unsealed penetrations, and floors that transmit vibrations. The ceiling also plays a major role, especially if there are rooms above. If a single component is left unaddressed, it can limit the effectiveness of other improvements.

The difference between soundproofing and sound absorption

Sound insulation is about stopping sound from traveling between rooms. Sound absorption, on the other hand, is about reducing echo and reverberation within the same room. In a drum room, sound absorption can improve the playing experience, but it does not solve the main problem if the noise spreads to the surrounding area. To reduce sound leakage, the right construction, sealing, mass, and vibration damping are essential.

Here’s how to get closer to a quieter music room

The best approach is to start with the biggest leakage points and build the solution step by step. A well-sealed door, a well-designed floor, stronger walls, a better ceiling, and controlled vibrations all make a big difference together. When the right materials are used in the right places, the music room becomes better soundproofed and significantly more considerate of the rest of the house or building.