




• Free shipping
  • 5-year warranty
  • Fast delivery

How to Set Up a Classroom Adapted for Students with NPF

A classroom environment affects how easy it is to focus attention, understand what is going to happen, and recover between demanding activities. For students with neurodevelopmental disorders (NDP), noise, glare, movement in their field of vision, or confusing furniture arrangements can take up a disproportionate amount of energy. At the same time, needs vary from person to person. The goal should therefore not be an “NDP room” with a specific aesthetic, but rather an accessible learning environment that is easy to understand and adjust.

View the interior design as a system where the physical, educational, and social environments interact. A screened-off space is only helpful if the student knows when it can be used and does not perceive it as a punishment. A visual schedule is most effective when it has a fixed location and is used consistently. Acoustic measures are more effective when accompanied by a reduction in scraping noises, unnecessary talking across the room, and noisy technology.

Start by observing a typical day. Note where traffic flows intersect, where students wait, which sounds recur, and which surfaces draw attention away from the lesson. Be sure to document the same classroom during lectures, group work, and individual work. This makes it easier to distinguish a general problem in the room from a need related to a specific activity or student.

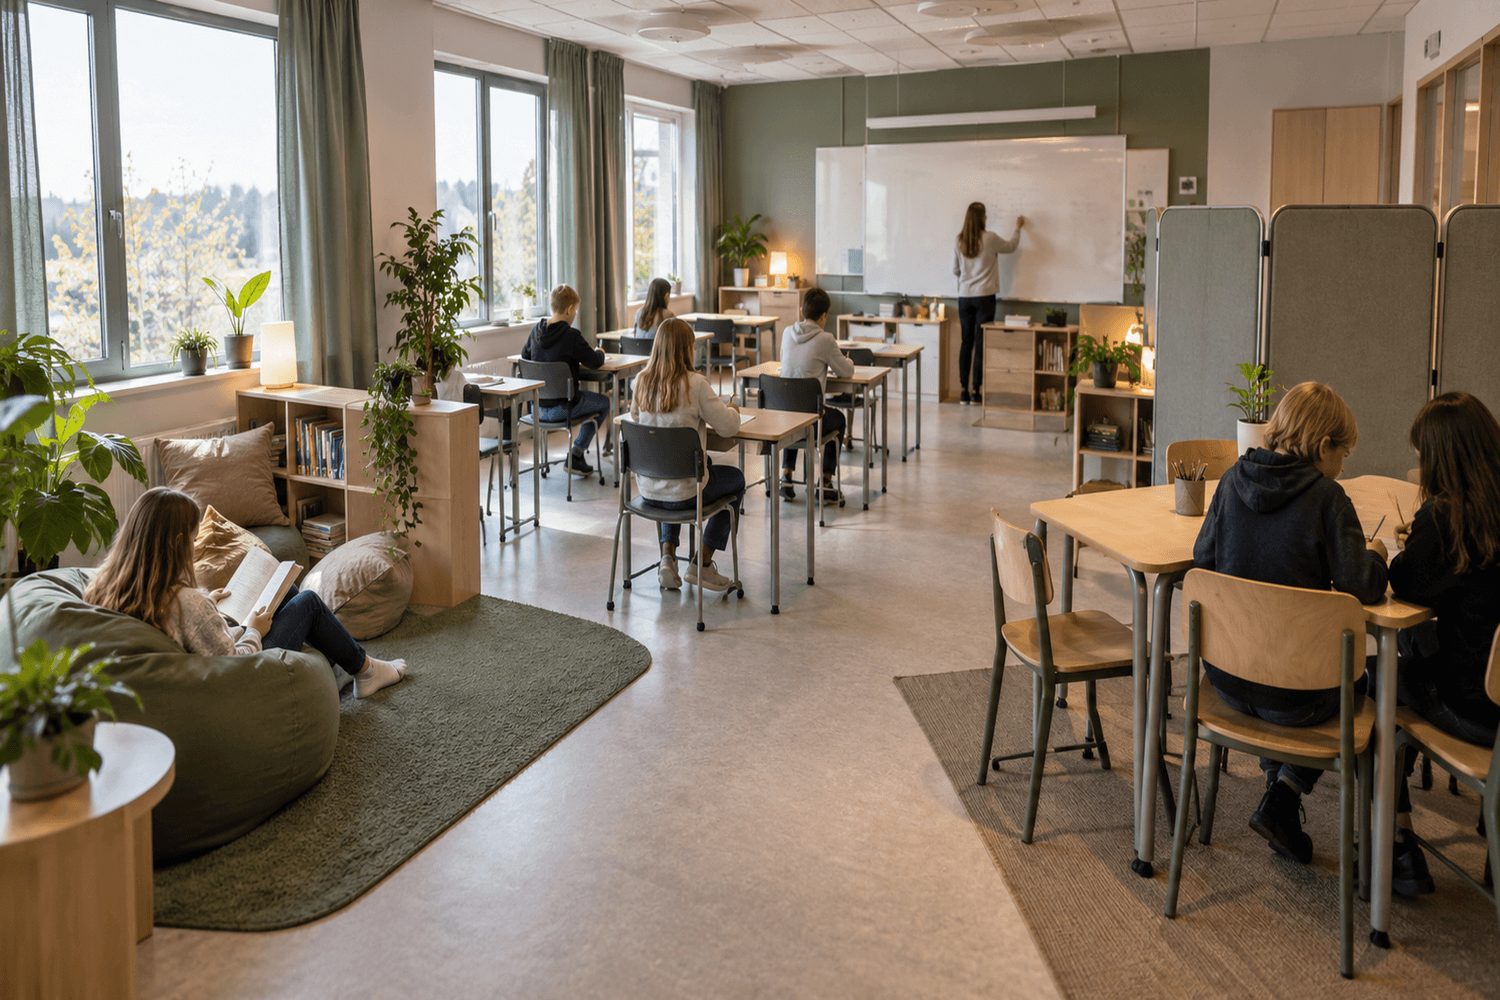
Next, divide the room into a few, clearly defined zones. Students should be able to see where group instruction takes place, where materials are located, where collaboration is allowed, and where they can work with fewer distractions. Keep walkways clear and avoid placing the quiet area in the middle of a high-traffic flow. Place frequently used items near the activity where they’re needed so that the lesson isn’t interrupted by unnecessary trips.

The acoustic environment should be assessed early on. In a classroom with high reverberation, speech and scraping sounds linger and blend with the next sounds. Sound absorbers are therefore one of the most effective measures for improving room acoustics. We generally recommend starting with the ceiling and then assessing the need for treatment on walls, near windows, and close to individual workstations. If the disturbance instead comes through a wall, door, or ceiling, an investigation of the sound insulation is required; adding more absorbers to the room will not stop sound transmission.

Finally, work in small, measurable steps. Move furniture, gather visual materials, muffle specific noise sources, and try out a new work arrangement before making any major purchases. Ask the students what actually helps, but supplement their answers with your own observations. Follow up after a few weeks: Are the zones being used as intended? Are the instructions easier to understand? And are new disruptions arising elsewhere? The best solution is the one that works in the classroom and can be adjusted over time.

Recommended Products

Key Principles for an NPF-Adapted Classroom.

Make sure every part of the classroom serves a clear purpose, and keep the walkways clear.
A few clearly defined zones are usually easier to navigate than many ambiguous stations.

Adjustable sensory stimulation

Make it possible to reduce light, sound, movement, and social proximity without the student having to leave the class entirely.

Calm visual environment

Group student work and information in designated areas, use closed storage where possible, and avoid shiny surfaces that create glare.

Good speech intelligibility

Minimize reverberation and background noise so that the teacher’s instructions are easier to distinguish from other sounds in the room.

Multiple functional workspaces

Provide spaces for group review, focused individual work, and collaboration, but make it clear when and how these spaces are to be used.

Predictable material flows

Assign fixed locations for materials, drop-offs, and pickups. This reduces searching, movement, and verbal interruptions.

Individual seating

A seat at the front, on the side, or with more space to move around can help different students. Try out the seating arrangement together with the student and evaluate it.

Ongoing follow-up

Adjustments need to be reviewed when the group, the tasks, or the schedule changes. Base your decisions on actual usage and adjust one factor at a time.

How to Plan and Decorate Your Classroom, Step by Step

Effective adaptation starts with what actually happens in the room. Therefore, approach the task in a clear sequence: assess, prioritize, test, and follow up. Below, we’ll walk through the classroom, from its basic structure to its acoustics and individual seating arrangements.

Step 1 – Assess activities and disruptions

Observe the classroom during lectures, individual work, group work, and transitions. Note where students walk, wait, and retrieve materials. Listen for the sounds of chairs, cabinet doors, ventilation, projectors, and conversation echoing through the room. Also look for glare, reflections, flickering lights, and movements that frequently enter students’ field of vision.

Ask students and staff to describe which situations take the most energy. Ask specific questions: When is it hard to hear the instructions? Where is it hard to stay seated? Which movements cause stress? The same environment can be experienced differently, so make sure the assessment captures multiple perspectives.

Step 2 – Create Clear Zones and Walkways

Designate a fixed location for group sessions, one for individual work, and one for collaboration. The zones do not need to be separated by walls; the orientation of the furniture, a rug, or a discreet screen may suffice. Keep the number of zones to a minimum and ensure their functions are consistent.

Place frequently used materials near the appropriate activity. Backpacks, charging stations, and drop-off areas should have designated spots away from the busiest walkways. Ensure that students can leave their seats without crowding past others and that no workstation is located directly where the door opens or where a line typically forms.

Step 3 – Reduce visual clutter

Group student work, posters, and information in one or a few designated areas. Keep the area around the bulletin board uncluttered so that the current content is easy to find. Store spare materials and items used infrequently in covered cabinets or uniform boxes.

Use color for orientation, not as constant stimulation. For example, a color trail can indicate where materials belong, while walls and large pieces of furniture are kept in calmer tones. Avoid high-gloss paint and position screens so that windows and lights do not create glare.

Step 4 – Make the lighting adjustable

Take advantage of natural light but supplement it with curtains, blinds, or sunshades so that bright light can be dimmed. Check the classroom at different times of the day; a spot that works in the morning may be too bright in the afternoon. If the lighting can be zoned, adjust the light level to the activity and avoid having all fixtures turned on at the same time.

Ensure that the teacher’s face and the board are clearly lit without backlighting. An individual desk lamp can be an option in a quiet area, but introduce it as one choice among several and make sure it doesn’t disturb others.

Step 5 – Reduce Noise at the Source

Attach the proper furniture glides to chairs and tables, adjust rattling hardware, and choose storage that doesn’t slam shut. Place noisy technology away from areas where students need to concentrate, and service equipment that hums. Soft pads under lab equipment can reduce short but recurring impulse noises.

Also establish routines for retrieving materials and changing groups. Fewer simultaneous movements can make a big difference without reducing the flexibility of instruction.

Step 6 – Improve Room Acoustics

If speech and scraping sounds linger in the room, the reflections need to be dampened. Sound absorbers are typically the most effective measure for improving acoustics. We recommend starting with the ceiling, which often provides a large absorptive surface without competing with furniture or teaching materials. PES ceiling is an all-around solution for school environments, while PES for exposed-beam ceilings is suitable for existing exposed-beam ceilings.

Then supplement as needed. PES wall attenuates harsh wall reflections. Silent Curtain Feltra can soften the sound from windows and glass partitions. Absorbers reduce echoes in the room but do not block sound traveling through building structures. In cases of noticeable noise from hallways or adjacent rooms, doors, windows, and the building structure must be assessed separately.

Step 7 – Create a quiet workspace without isolating it

Place one or more quieter workspaces along the edge of the room, with a clear view of the teacher and the board but less movement behind you. A Bulletin Desk Screen can provide a local partition at the desk. A Silent Divider Feltra can create a more distinct zone in a larger room.

Make this space a normal work option that multiple students can use, not a place where a student is sent when something has gone wrong. Decide together when it’s appropriate, how long it should be used, and how the student will rejoin the group.

Step 8 – Customize seating and support on an individual basis

One student may need to sit close to the teacher to minimize distance and distractions. Another may need a spot off to the side, more space to move around, or the ability to vary their sitting position. Avoid making assumptions based solely on a diagnosis. Experiment with seating arrangements and assistive devices based on the student’s feedback, the demands of the lesson, and staff observations.

Keep visual schedules, time-management aids, and instructions in designated locations. Offer a few clear choices and show what is expected for the current activity. The physical layout should make the educational structure visible.

Step 9 – Test, Follow Up, and Adjust

Ideally, make a few changes at a time and decide in advance what you will follow up on. This could include fewer interruptions, better audibility, smoother transitions, or the independent use of a quiet workspace. Evaluate the changes after two to four weeks together with students and staff.

Keep what works, adjust what almost works, and remove anything that has become yet another source of disruption. An accessible learning environment is adaptable: when the student group, instruction, or schedule changes, the classroom needs to be able to adapt along with them.

Sound calculation software.

Sound calculation software.

If you’d like a better basis for your acoustic measures, you can use our tool to calculate the reverberation time. The calculation provides guidance, but in classrooms with complex geometry, multiple uses, or special requirements, a professional acoustic assessment may be necessary.

Did you know that…

Did you know that a calm and well-organized classroom environment can benefit the entire class, not just students with neurodevelopmental disorders? Clearly defined work zones, designated spots for materials, adjustable lighting, and fewer distracting noises make it easier to understand what’s going to happen and where different activities should take place.

Even small changes can affect the acoustic environment. Furniture glides, soft mats, quieter handling of materials, and well-planned movements reduce noise at the source. When the classroom also has sufficient sound absorption, speech becomes clearer and echoes and reverberation are reduced. We generally recommend that the ceiling be sound-absorbed first, and that walls, windows, and individual workstations be treated as needed based on the room’s specific requirements.

Featured Articles

How can you soundproof and sound-absorb a classroom?

Echo - Here's How to Reduce Echo in the Classroom

Products that are useful for an NPF-adapted classroom.

For a quieter and more accessible classroom, we recommend improving the acoustics in a systematic manner. Typically, start with sound absorption on the ceiling and then add treatment to the walls, windows, and individual workstations as needed for the room. The products below can reduce reverberation, dampen sound reflections, and create clearer work zones without separating students from the class community.

PES ceiling is a flexible ceiling absorber for school environments where talking, scraping noises, and other activities create long reverberation times. The ceiling is typically the first surface we recommend treating with sound absorption.

PES Allergy ceiling is suitable for classrooms where you want to improve the speech environment and reduce echoes with a ceiling absorber that does not have a fabric surface.

PES for exposed-beam ceilings is a practical option when the classroom already has a exposed-beam ceiling. The absorbers are mounted within the exposed beams and improve the acoustic environment without requiring a separate, visible special structure.

PES wall complements the ceiling absorbers in areas where hard wall surfaces cause significant sound reflections. The product is suitable, for example, behind or to the side of the teaching area and near spaces where multiple students work together.

Bulletin Desk Screen attenuates sound near the workspace and reduces movement in the student’s field of vision. The desk screen can be used where a student needs a clearer boundary for focused work.

Silent Divider Feltra helps divide the classroom into distinct work zones without the need to build a permanent wall. At the same time, it can reduce distracting reflections and background chatter in open areas of the room.

Silent Curtain Feltra is ideal for windows and glass partitions where hard surfaces reflect sound. The curtain contributes to a softer acoustic environment and can also be used to control distracting daylight and glare.

SilentDirect Bulletin combines a practical, pin-friendly display surface with sound absorption. It’s ideal when a classroom needs a centralized space for current information without creating yet another hard wall surface.

*Free shipping

Free shipping to a pickup location

5-Year Warranty

5-Year Product Warranty

Fast Delivery

Usually ships the same day

A Calmer and More Predictable Classroom for Different Ways of Functioning

Designing a classroom for students with neuropsychiatric disabilities (NPD) is not about creating a special environment for a single type of student. Students can react very differently to sound, light, movement, visual stimuli, and social proximity. An accessible learning environment must therefore be clear, adjustable, and flexible: students should be able to understand what is happening in the room, find their place, and choose a way of working that suits the task without being separated from the group.

Focus on function rather than decoration

Start by mapping out how the classroom is used during a typical school day. Where do lessons take place, as well as individual work, collaboration, retrieving materials, and transitions? Arrange furniture so that walkways are clearly defined and students do not have to pass closely behind one another unnecessarily. Create designated zones for different activities, but avoid filling the room with many small stations that compete for attention. Lockable cabinets, centralized display areas, and clearly labeled storage spaces make it easier to maintain an overview.

Provide the ability to adjust visual and auditory stimuli

Lighting should be adjustable according to the activity and the individual. Take advantage of natural light, but use curtains or sunshades to reduce glare and reflections. Choose matte surfaces and a cohesive color scheme where contrasts aid orientation rather than serving as decoration. A quiet workspace at the edge of the room can reduce the field of vision and the number of movements, while another student may need to sit close to the teacher to more easily follow instructions. Seating arrangements should therefore be tested together with the student and monitored over time.

A good acoustic environment is essential when speech, scraping noises, and concurrent activities would otherwise blend together. Sound absorbers reduce echoes, reverberation, and sound reflections within the classroom itself; they do not replace sound insulation between rooms. SilentDirect typically recommends that the ceiling be sound-absorbed first, as it is often a large, unobstructed surface. See sound absorbers for school ceilings and, if necessary, supplement them with wall absorbers, sound-dampening curtains, desk screens, or room dividers. Furniture pads, quiet material handling, and maintenance of humming equipment also reduce noise at the source.

Make the structure and choices clear

The interior design works best when it supports the teaching process. Assign fixed locations for the day’s planning, materials, and instructions. Keep the whiteboard area clear of anything unrelated to the current task and make it clear where a task begins, where it ends, and where completed work should be submitted. Feel free to offer a few defined options—such as a regular spot, a screened-off workspace, and a place for collaboration—but avoid confusing choices among too many different environments.

Test, observe, and adjust

No single seating arrangement suits all students or all lessons. Therefore, gather feedback from students and staff, observe where disruptions occur, and make changes one thing at a time. Pay particular attention to transitions, lines forming, noise from chairs, glare on screens, and whether the quiet space is truly accessible without feeling like it singles anyone out. An NPF-adapted classroom is not a fixed concept but a learning environment that can be adjusted as the group, the instruction, and the needs change.