




• Free shipping
  • 5-year warranty
  • Fast delivery

How do you soundproof a ceiling?

Soundproofing a ceiling often involves reducing noise from the floor above. This can include footfall noise, vibrations, voices, music, or other sounds that travel through the floor joists, gaps in the joints, and the building’s structure. To achieve good results, a single material is rarely sufficient. Instead, an effective solution relies on combining several principles: airtightness, mass, vibration damping, decoupling, and sound absorption in cavities.

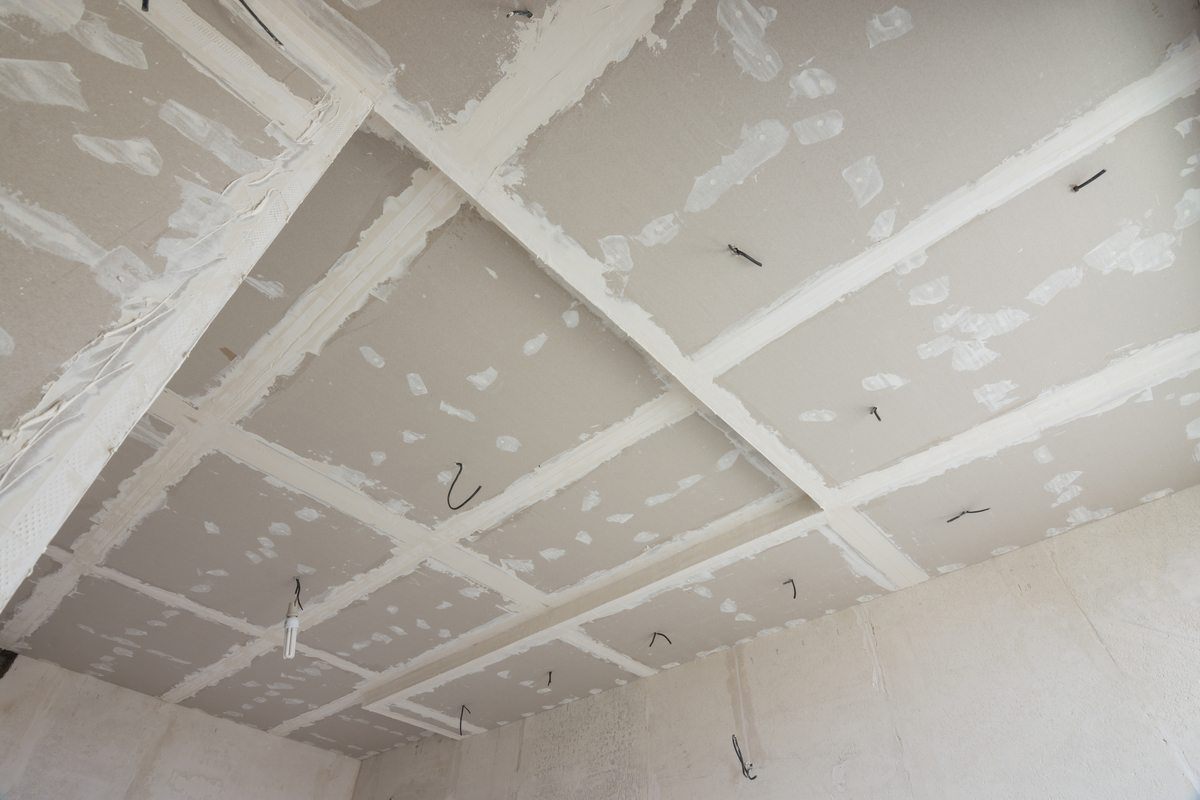
The first step is always to analyze the existing ceiling. Check for cracks, joints, holes, pipe penetrations, ventilation, and connections to walls. Even small openings can allow sound to pass through the structure. Therefore, visible gaps and weak points should be sealed before new sound-insulating layers are installed.

It’s also important to distinguish between sound insulation and sound absorption. Sound insulation is used when the goal is to reduce sound transmission between floors or rooms. Sound absorption is used when the goal is to reduce echo and reverberation within the same room. If you hear noise from neighbors above, it is primarily the ceiling’s sound insulation that needs to be improved. If the room sounds harsh, rattly, or echoey, ceiling absorbers may be the right addition.

SilentDirect recommends two main options for ceiling sound insulation. The most effective option is to install a new suspended ceiling with a stud framework, dampened contact surfaces, an absorber in the air gap, and a new heavy ceiling layer. This method offers the best opportunity to reduce impact sound, structure-borne sound, and airborne sound. The second option is a thinner solution without joists, where sound-insulating and vibration-damping materials are installed directly against the existing ceiling before a new ceiling finish is installed.

Which solution is best depends on the ceiling height, construction, type of noise, and the extent of work that can be done. It is difficult to guarantee a completely soundproof ceiling in an existing building, since sound can also travel through walls, utilities, and the building frame. However, the right construction can significantly reduce sound transmission and create a quieter, more comfortable environment.

Recommended Products

Key Principles for Sound Insulation of Ceilings.

  • Sealing: Cracks, joints, and penetrations must be sealed because sound easily leaks through small openings.
  • Mass: Heavy, dense layers help dampen airborne sound, such as voices and music.
  • Decoupling: Materials in direct contact with one another can transmit vibrations. Damping interlayers reduce this transmission.
  • Air gap: A new suspended ceiling with an air gap can provide better sound insulation than a completely solid structure.
  • Cavity Absorption: Sound-absorbing material in the air gap reduces resonance and improves the structure’s performance.
  • Heavy new roof surface: OSB and drywall, or double layers of drywall, provide a stable finish with greater mass.
  • Vibration damping: Impact sound and structure-borne sound require measures that reduce vibrations in the structure.
  • Realistic holistic approach: The ceiling should be considered in conjunction with walls, floor joists, and utilities, as sound can travel along multiple paths.

Option 1 – The Most Effective Way to Soundproof a Ceiling

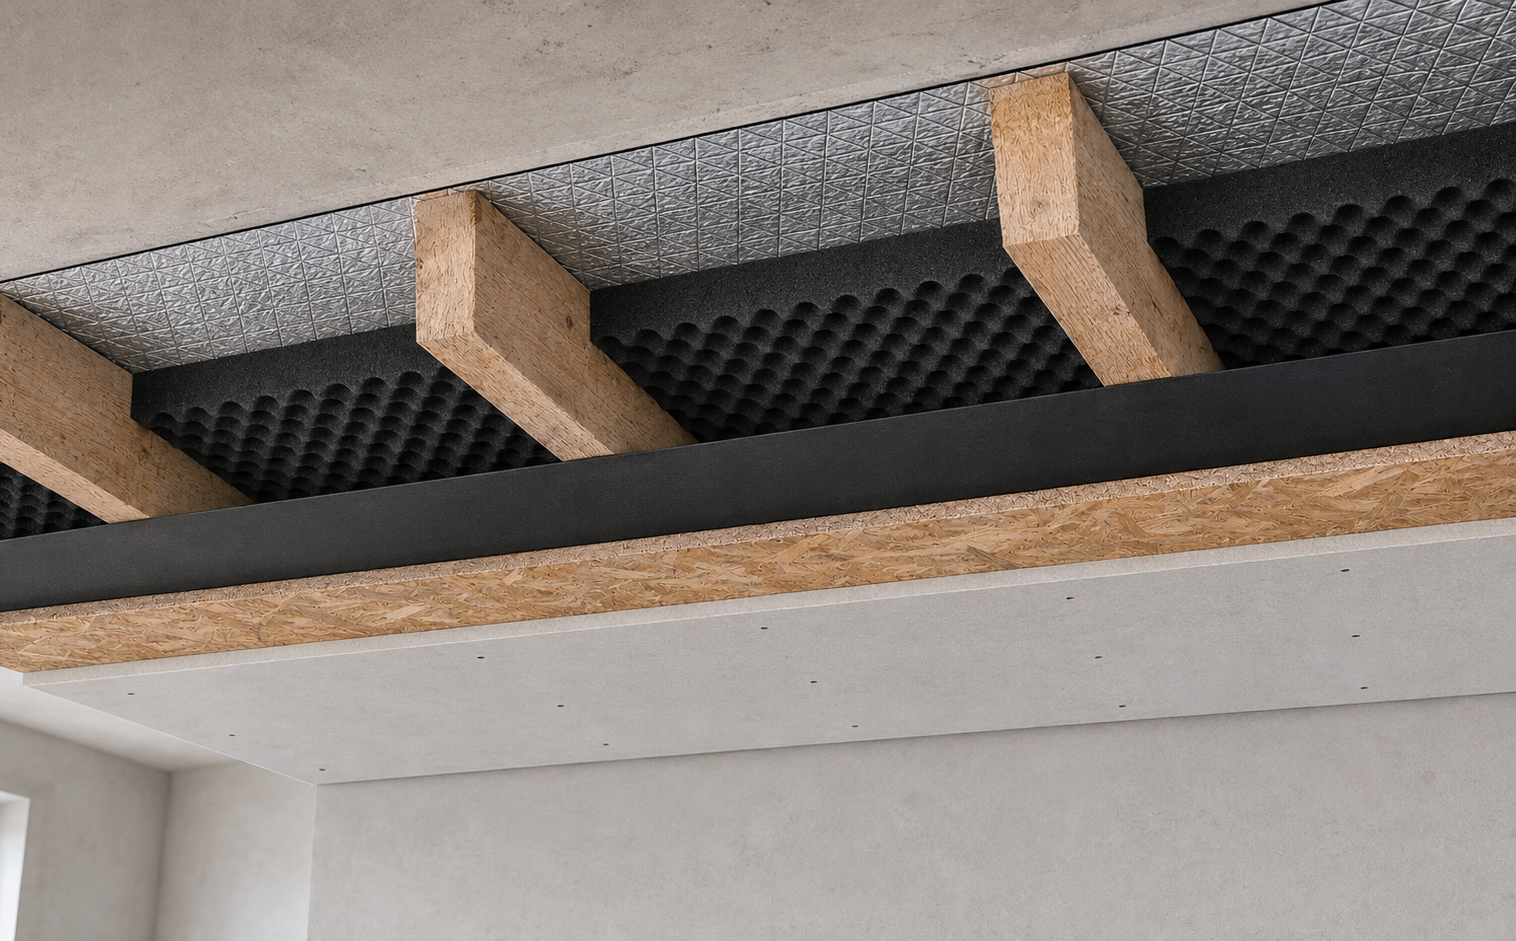
This is the best solution when you want to soundproof a ceiling as effectively as possible. The design consists of multiple layers that together reduce vibrations, airborne sound, and sound leakage. It’s particularly well-suited when you have disruptive noise coming from above—such as footsteps, voices, music, or vibrations from the floor above—or if you want to block sound from your floor to your neighbor’s.

The optimal design combines SilentDirect Polaric and SilentDirect MLV. Polaric is used as the first layer, primarily to dampen vibrations, impact noise, and structure-borne noise. MLV is installed on the studs primarily as a heavy, dense barrier layer against airborne sound, such as voices and music. If you have both types of noise problems, the combination of Polaric and MLV is often the most comprehensive solution.

  1. Inspect the existing ceiling


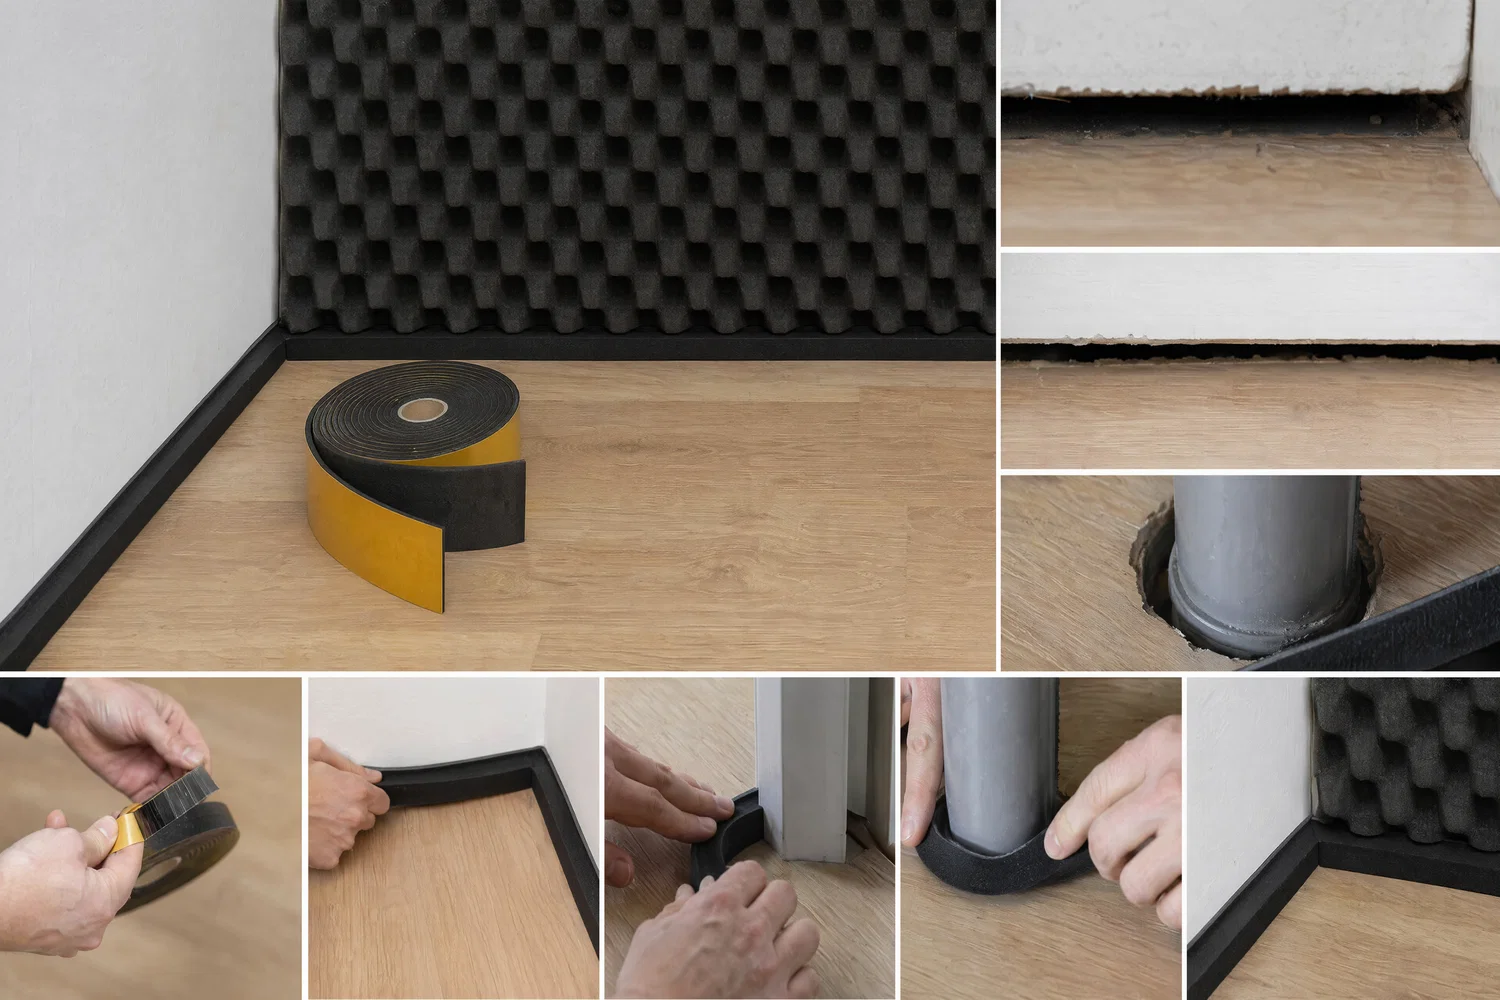
    Start by carefully inspecting the ceiling. Look for cracks, gaps, joints, holes, pipes, vents, and other penetrations where sound can leak through. Seal any weak spots with a suitable sealant or caulk before continuing with the installation. A soundproof ceiling is only as good as its weakest points. You can also use SilentDirect Seal —a sealing strip—here.

  2. Install Polaric, MLV, or both layers


    Install SilentDirect Polaric, SilentDirect MLV, or a combination of both over the entire ceiling surface.

    Choose Polaric if the problem is primarily vibrations, impact noise, or structure-borne noise.
    Polaric should always be the first layer against the existing ceiling to provide the best protection against vibrations, which is what this product specializes in.

    Choose MLV instead if the problem is primarily airborne sound. You can choose to install a layer of MLV directly against the existing wall if you are not using a layer of Polaric but still want to counteract some vibrations, as this product also blocks a small amount of vibration. However, MLV specializes primarily in airborne sound.

    Combine both if you want to address both problem areas as effectively as possible and achieve a more complete sound-insulating construction.

    If you use both products, we recommend dividing the installation areas as shown in the reference image to achieve a more effective design; this is because MLV is up to 30% more effective against airborne sound when installed on the studs.

  3. Seal all joints carefully


    All joints, edges, and transitions must be sealed thoroughly. For example, use SilentDirect Seal where a sound-dampening sealing strip is needed, and SilentDirect Aluminum Sealing Tape where joints in sound-insulating layers need to be kept tight. Even small gaps can significantly compromise the result.

  4. Install SilentDirect Neo or SilentDirect Egg


    Next, cover the structure with SilentDirect Neo or SilentDirect Egg. Neo works well as a damping intermediate layer that reduces vibrations and direct contact.

    Egg is well-suited for situations where you want more sound-absorbing material in the structure. Tailor your choice to the specific sound issues, your budget, the ceiling height, and the available installation space.

    However, we recommend using 25mm–50mm Egg in combination with a 50mm air gap in the structure to absorb sound entering the ceiling; this prevents the sound from amplifying inside the ceiling and absorbs the sound that is now blocked by the structure.

  5. Build a stud frame with an air gap


    Install the studs so that you create a 50 mm air gap between the existing ceiling surface and the sound insulation. The air gap makes the structure more effective because it helps break up the sound’s path through the ceiling. Try to avoid direct, hard contact between the studs and the existing ceiling, as vibrations can otherwise be transmitted through the structure.

  6. Dampen the studs with SilentDirect Seal


    For better decoupling, apply SilentDirect Seal to the parts of the joists that come into contact with the ceiling, walls, or the new ceiling structure. This reduces the risk of vibrations being transmitted between the materials. This is particularly important for impact sound and structure-borne sound. We recommend wrapping all joist contact points with 50/4 mm Seal – Sealing Strip.

  7. Fill the air gap if necessary


    If the construction allows it, the air gap can be filled with sound-absorbing material, such as polyester, glass wool, or rock wool. Avoid cellular plastic, as it does not have the proper sound-absorbing properties. A soft, absorbent material in the cavity helps reduce resonances in the structure; SilentDirect Air works well here.

  8. Install the new ceiling


    Finish with a new, heavy ceiling, such as OSB board followed by drywall or double layers of drywall. Different materials in multiple layers help dampen different frequencies.
    Be sure to stagger the joints between the layers of panels and seal carefully around the entire perimeter of the ceiling.

    The combination of OSB and drywall makes it easier to attach items such as light fixtures or brackets to the ceiling with screws.

Result: This option provides the most effective solution because it combines airtightness, mass, vibration damping, decoupling, an air gap, and a new, heavy ceiling. Tailor the construction to your specific noise issues, your budget, how much headroom you can spare, and the scope of the work you wish to undertake.

Option 2 – Soundproofing a Ceiling Without Joists

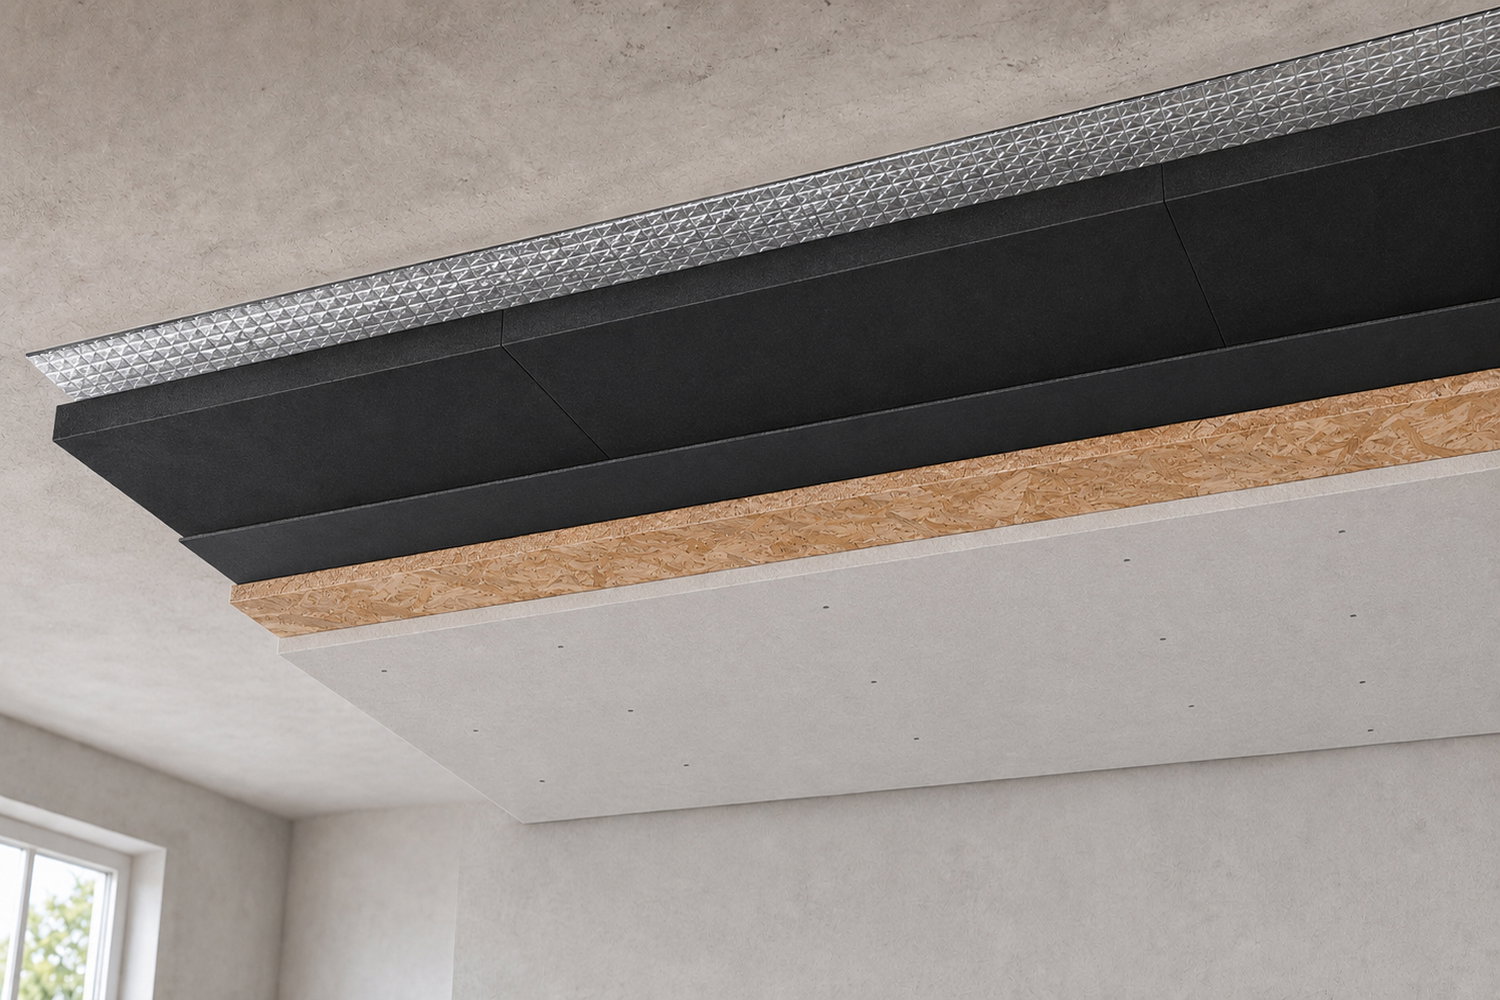
This option is suitable when you want to improve sound insulation in a ceiling without installing a separate framework. It is a thinner solution that is particularly useful when ceiling height is limited, when you want to keep the construction simpler, or when your budget does not allow for a more extensive suspended ceiling solution.

Here, too, you can tailor the design to the specific problem. SilentDirect Polaric is primarily used for vibrations, impact noise, and structure-borne noise. SilentDirect MLV is primarily used for airborne noise, such as voices and music. If you have both types of problems, you can combine Polaric and MLV before installing the next layer of sound insulation.
Or install them separately, as shown in the reference image.

  1. Inspect and seal the existing ceiling

    Start by checking that the ceiling is stable, dry, and free of loose materials. Look for gaps, cracks, joints, vents, pipes, and other penetrations. Seal any weak spots before installing sound-insulating material. This is especially important because this solution does not have the same air gap and decoupling as Option 1.

  2. Install Polaric, MLV, or both over the entire ceiling surface

    Install SilentDirect Polaric, SilentDirect MLV, or both layers directly onto the existing ceiling. Use Polaric when vibrations and impact noise are the main issues. Use MLV when airborne noise is the main issue. Combine them if you want to create a more comprehensive solution that addresses both vibrations and airborne noise.

  3. Extend the material beyond the edges

    To reduce sound leakage at the edges, the material should be installed to cover as much of the surface as possible. Where practical, the mat can extend slightly beyond the connection to the side walls. This makes the construction tighter and reduces the risk of weak points along the outer edges of the ceiling.

  4. Seal joints and transitions

    Seal all joints thoroughly. Use SilentDirect Seal where you need a sound-absorbing sealing strip and SilentDirect Aluminum Sealing Tape where the joints in the sound-insulating layers need to be kept closed. Thorough sealing is crucial for the solution to work effectively.

  5. Install SilentDirect Neo as a damping intermediate layer

    Next, cover the entire ceiling with SilentDirect Neo. Neo helps reduce vibrations and acts as a damping layer between the existing ceiling and the new ceiling covering. Choose the thickest variant that is practically feasible, taking into account ceiling height, budget, and the desired effect.

  6. Install the new ceiling

    Then install the new ceiling through the previous layers and into the existing structure. For best results, a heavy panel construction is recommended, such as OSB followed by drywall or double layers of drywall. The combination of multiple layers with different densities helps dampen sound more effectively than a single thin layer.

  7. Seal around the entire new ceiling

    Once the new ceiling is installed, carefully seal around all the edges, corners, and penetrations of the ceiling. Use joint compound, sealant, or construction adhesive that can both bond and seal where needed. This reduces the risk of sound leakage and makes the structure more cohesive.

Result: This option takes up less headroom and is simpler than a suspended ceiling with joists. It typically isn’t as effective as Option 1, but can be an excellent choice when you want to improve sound insulation without undertaking a major renovation. Tailor the layers based on whether your biggest issue is vibrations, airborne sound, budget, headroom, or a combination of factors.

Sound calculation software.

Sound calculation software.

If you want to estimate the amount of material needed, start by measuring the length and width of the ceiling. When soundproofing a ceiling, it’s important to calculate the total surface area and account for seams, overlaps, waste, and connections to walls.

You can also use SilentDirect’s calculation and estimation pages to help you plan your project:

Cost Estimator for Sound Insulation

Did you know that…

Did you know that small gaps can compromise sound insulation more than you might think? Sound tends to travel through cracks, joints, penetrations, and loose connections. That’s why sealing around the entire ceiling structure is just as important as choosing the right sound-insulating materials.

It’s also common to confuse sound insulation with sound absorption. Ceiling absorbers can make a room more comfortable by reducing echoes, but they don’t usually block sound from neighbors above. That requires a denser, heavier construction that reduces sound transmission between spaces.

Selected Articles

Sealing strip. A tight seal is essential for sound insulation!

What is the difference between sound insulation and sound absorption?

How do you soundproof a ceiling with sound absorbers?

Products that are effective for soundproofing and sound-absorbing a ceiling

When soundproofing ceilings, you need products that serve different functions within the structure. Some are used for mass and as a barrier, while others are used for vibration damping, sealing, or sound absorption in cavities. The products listed below are relevant when planning a ceiling designed to reduce noise from above or improve the acoustic environment in the room.

SilentDirect Polaric is suitable when the ceiling requires a thin sound-insulating and vibration-damping layer. It is used to reduce vibrations, impact noise, and structure-borne noise in hard surfaces and structures.

SilentDirect MLV is suitable when airborne sound—such as voices or music—needs to be dampened with a heavy, dense sound barrier in the ceiling structure.

SilentDirect Neo is used as a damping intermediate layer that can help reduce vibrations and limit direct contact between the existing ceiling and new ceiling cladding.

SilentDirect Neo Roll is practical for larger areas, where the roll format makes it easier to cover contiguous ceiling sections.

SilentDirect Egg can be used in cavities or utility spaces where absorbent material is needed to reduce resonances and sound reflections within the structure.

SilentDirect Egg roll is an option when larger areas or more irregular sections need to be covered with absorbent material.

SilentDirect Seal is used on gaps, joints, and contact surfaces where small air leaks or vibrations can compromise sound insulation. It is particularly useful for decoupling studs and sealing connections.

SilentDirect Aluminum Sealing Tape is used to seal joints in sound-insulating structures where leaks could compromise the performance.

PES Ceiling is a ceiling absorber that is appropriate when the issue involves echo and reverberation within the same room, rather than sound transmission through the ceiling.

PES Ceiling Deep Absorb is suitable for rooms where the ceiling requires stronger sound absorption, such as in larger spaces, rooms with higher ceilings, or where reverberation is a more pronounced issue.

SilentDirect Air is suitable when you want to fill the air gap with a sound-insulating material while still preserving the properties of an air gap. When filling an air gap, it is important to use materials that do not seal it off and restrict the free movement of sound within the ceiling; this allows sound to be absorbed more effectively by the structure, which this product and similar materials facilitate.

*Free shipping

Free shipping to a pickup location

5-Year Warranty

5-Year Product Warranty

Fast Delivery

Usually ships the same day

How do you soundproof a ceiling?

Soundproofing a ceiling is an important step toward creating a more comfortable indoor environment by reducing disruptive noise from upper floors or external sources. By using the right methods and materials, you can effectively reduce both airborne sound—such as conversations and music—and structure-borne sound from footsteps and moving furniture. Whether you want to improve the work environment in your office, increase comfort in your home, or create optimal conditions for sound-sensitive environments, properly installed soundproofing is essential.

Ceiling soundproofing isn’t just about dampening noise—it can also improve the room’s acoustics and, in some cases, contribute to increased energy efficiency through additional insulation. To achieve the best results, a combination of sound-absorbing materials, decoupled structures, and sealing solutions that prevent sound leakage is often used. Below, we’ll go over the main benefits of soundproofing a ceiling and how it can contribute to a quieter and more harmonious environment.

The Benefits of Soundproofing a Ceiling

Reduces sound transmission and noise
Soundproofing the ceiling effectively reduces the transmission of sound between floors and from external noise sources. This is particularly important in homes and offices where noise from other floors can be disruptive and affect concentration and well-being.

Creates a quieter and more pleasant indoor environment
By reducing sound transmission, soundproofing contributes to a calmer environment, which is essential for a good night’s sleep at home or a productive work environment at the office. In open-plan offices or business premises, this can be a key factor in reducing distractions and stress.

Improves Room Acoustics
Sound insulation not only helps block out noise but can also improve a room’s acoustic properties by reducing reverberation and echoes. This is particularly relevant in spaces where sound quality is important, such as recording studios, home theater systems, or conference rooms.

Increased Privacy and Confidentiality
By reducing sound leakage, sound insulation creates a more private environment, which is particularly valuable in offices, meeting rooms, and homes where you want to prevent sound from spreading between rooms. This can be crucial for businesses that require a high level of confidentiality, such as law offices or medical clinics.

Energy Efficiency and Temperature Control
Some soundproofing systems also have thermal properties and act as an additional insulation barrier. By reducing heat loss in the winter and keeping heat out in the summer, soundproofing can help lower energy costs and contribute to a more sustainable building.

Protects Against External Noise
For those who live or work in noisy environments—such as near major roadways, airports, or industrial areas—effective sound insulation of the ceiling can help block out disruptive noise and create a quieter indoor environment.