Products that are good for soundproofing and sound dampening a wall
Option 1 – The Best Solution for Wall Sound Insulation
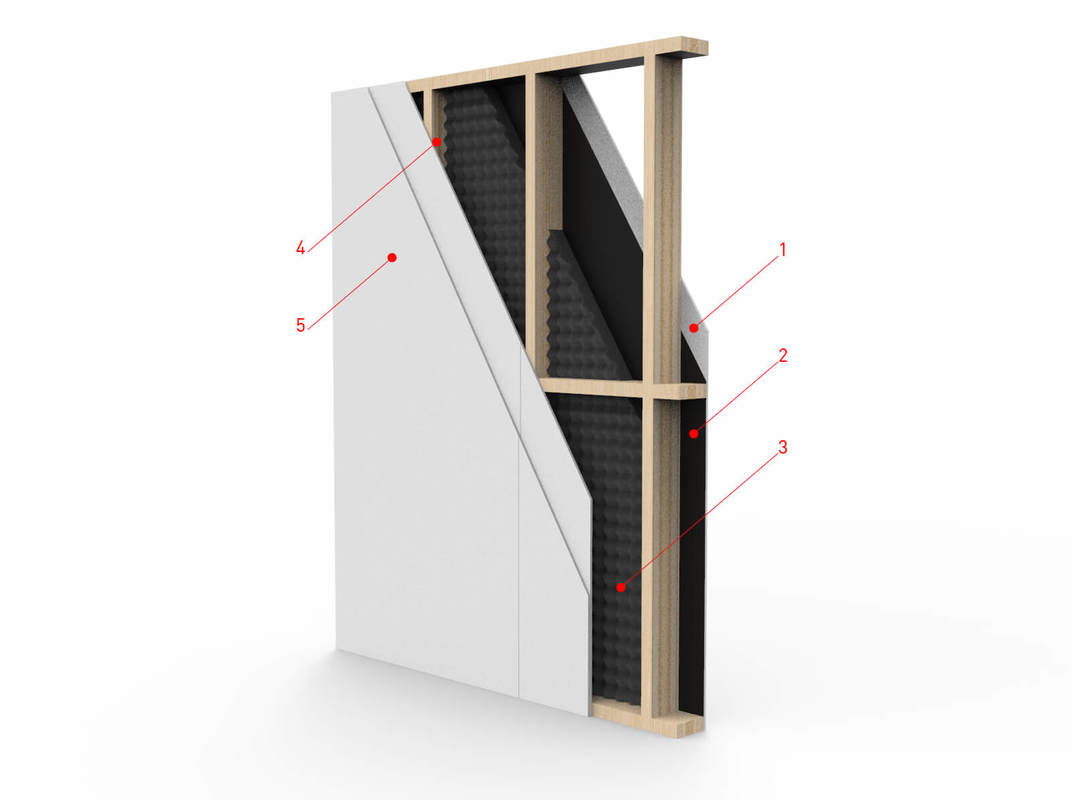
This is the most comprehensive solution when you want to soundproof an existing wall as effectively as possible. The method involves first installing a vibration-damping layer against the existing wall, then creating a decoupled stud frame, and finally building a new wall in front of the existing structure.
1. Existing wall or surface
2. SilentDirect Polaric damping mat
3. SilentDirect Neo
4. Stud frame with air gap and sound-absorbing material
5. SilentDirect MLV mounted on the studs or within the new wall structure
6. New wall, such as OSB and drywall
Step 1
First, install the SilentDirect Polaric damping mat over the entire existing wall or surface to be soundproofed. It is best to use Polaric as the first layer directly against the existing wall or surface, as this provides the most effective damping and helps prevent the transmission of vibrations through the structure. The material should cover the entire surface as thoroughly as possible.
The Difference Between the SilentDirect Polaric Damping Mat and SilentDirect MLV
Both the SilentDirect Polaric damping mat and SilentDirect MLV are used for sound insulation, but they have different strengths and should ideally be placed in different locations within the structure. The SilentDirect Polaric damping mat is particularly suitable when you want to reduce vibrations, resonances, and structure-borne noise. Therefore, Polaric is best installed as the first layer against the existing wall or surface.
SilentDirect MLV, on the other hand, is particularly effective when the goal is to reduce airborne sound, such as voices, music, TV audio, or other sounds passing through the wall. MLV acts as a heavy and dense sound barrier. To achieve the best results with MLV, it should primarily be installed on the studs or within the new wall structure, where it can function as a heavy, continuous barrier layer.
If the problem is primarily vibrations, structure-borne noise, or resonance in the wall, the SilentDirect Polaric damping mat is usually the best choice as the first layer against the existing wall. If the problem is primarily airborne sound passing through the wall, SilentDirect MLV is usually the best choice as a heavy sound barrier in the new wall construction. For the best results against both vibrations and airborne sound, the products can be combined—for example, by using the SilentDirect Polaric damping mat directly against the existing wall and SilentDirect MLV on the studs or in the new wall. This provides the wall with both better vibration damping and better resistance to airborne sound.
It is important that all joints are sealed, as unsealed joints can allow sound to pass through even if the rest of the wall is constructed correctly. Seal the joints with a suitable material, such as sealant, mounting adhesive that also seals, or SilentDirect Seal. For overlaps, foil-covered surfaces, or joints where tape is practical, SilentDirect Aluminum Sealing Tape can also be used to reduce the risk of sound leakage.
Extend SilentDirect Polaric approximately 2–3 cm toward the ceiling, side walls, and floor all around. This reduces the risk of gaps forming around the surface to be soundproofed. The SilentDirect Polaric soundproofing mat is flexible but also heavy. Therefore, it needs to be securely fastened using, for example, a staple gun, screws, mounting adhesive, or another suitable fastening method depending on the substrate.
Tip 1: For walls that are difficult to work with
If the wall is made of drywall, concrete, or another material that is difficult to screw or staple into, you can first install a wooden panel. Use, for example, OSB, plywood, particleboard, or another wood-based material. This creates a stable base to which SilentDirect Polaric can be more easily secured.
Tip 2: Install Polaric in a different location
For the best vibration-damping effect, you want to install SilentDirect Polaric directly against the existing wall or surface. If the construction requires a different solution, Polaric can also be placed elsewhere in the wall structure, but the most important thing is that the material is installed tightly and that connections to other walls, ceilings, and floors do not allow sound to leak through.
Step 2
Next, cover the entire wall with SilentDirect Neo on top of SilentDirect Polaric. In this option, SilentDirect Neo is used to ensure that the studs installed in the next step do not come into direct contact with the existing wall or surface. This reduces vibrations and prevents sound from being transmitted as easily through the structure.
Extend SilentDirect Neo toward the ceiling, side walls, and floor all around, with a length at least equal to the width of the studs. This ensures that the studs rest against a damping material rather than directly against hard building components. This reduces sound transmission in the form of vibrations and creates better conditions for effective sound insulation.
Budget Tips
An alternative is to skip the SilentDirect Neo 4 mm or 7 mm and instead install SilentDirect Seal on the back, top, and bottom of each stud that will be mounted against the existing wall or surface. This creates a simpler vibration-damping intermediate layer between the studs and the surrounding surfaces.
Step 3
Now install the studs in front of the existing wall or surface. The studs should be deep enough to extend at least about 5 cm beyond the SilentDirect Neo or the material used in the construction. This creates an air gap between the sound insulation and the new wall.
Once the studs are installed, you can place SilentDirect Egg or SilentDirect Neo between them. You can also fill the air gap with other porous, sound-absorbing materials, such as glass wool or rock wool. Avoid cellular plastic in this context, as it does not absorb sound in the same way. The key is that the material in the air gap is porous and sound-absorbing.
If you also want to improve the wall’s resistance to airborne sound, install SilentDirect MLV on the studs or within the new wall structure before the new wall is closed off. MLV should be installed as tightly and continuously as possible to function as a heavy sound barrier. Seal joints and overlaps carefully, as even small gaps can reduce the effectiveness against airborne sound.
Our recommendation is to install at least two panels to form the new wall or surface. Start with an OSB panel and finish with a gypsum board. OSB makes the wall easier to screw into, while the combination of multiple materials is beneficial from a sound insulation perspective. It simply results in a heavier and more stable wall.
The reason the studs shouldn’t touch the existing wall directly is that direct contact transmits vibrations between the structures. If vibrations can travel directly from the new wall into the old wall, sound insulation is compromised. By dampening and decoupling the contact points, you reduce this transmission.
Tip
Before installing the OSB or drywall, you can also apply SilentDirect Seal to the front of each stud. This reduces vibrations from the new wall and prevents the wall sheathing from making such direct contact with the studs.
Step 4
Once the new wall is up, be sure to seal around the entire perimeter of the new wall. Seal against the floor, ceiling, side walls, corners, and penetrations. Use sealant, caulk, or construction adhesive that also acts as a sealant. This final step is important, as even small gaps around the new wall can allow sound to pass through.
All done! Enjoy the silence.