How do you soundproof a wall?

Soundproofing a wall—whether it's an interior wall, a wall in an apartment, or a wall facing a neighbor—is an effective way to reduce sound transmission between rooms and create a quieter, more comfortable environment. Many people wonder how best to soundproof a wall, especially after the wall has already been built. Whether it's to reduce disturbing noise from neighbors or traffic, or to improve sound insulation in a studio or workplace, there are several proven methods and materials to use.

Sound is transmitted through both airborne sound waves and vibrations in the structure of the building, making it necessary to combine different techniques to achieve the best possible results.

To effectively block sound, materials with high mass and density are required, as these prevent sound waves from penetrating the wall. Plasterboard combined with sound-insulating membranes such as SilentDirect MLV (Mass Loaded Vinyl) is a popular solution. MLV is a heavy and flexible material that creates a sound barrier without taking up much space. By installing at least two layers of plasterboard with a sound-insulating layer between the boards, sound transmission can be significantly reduced.

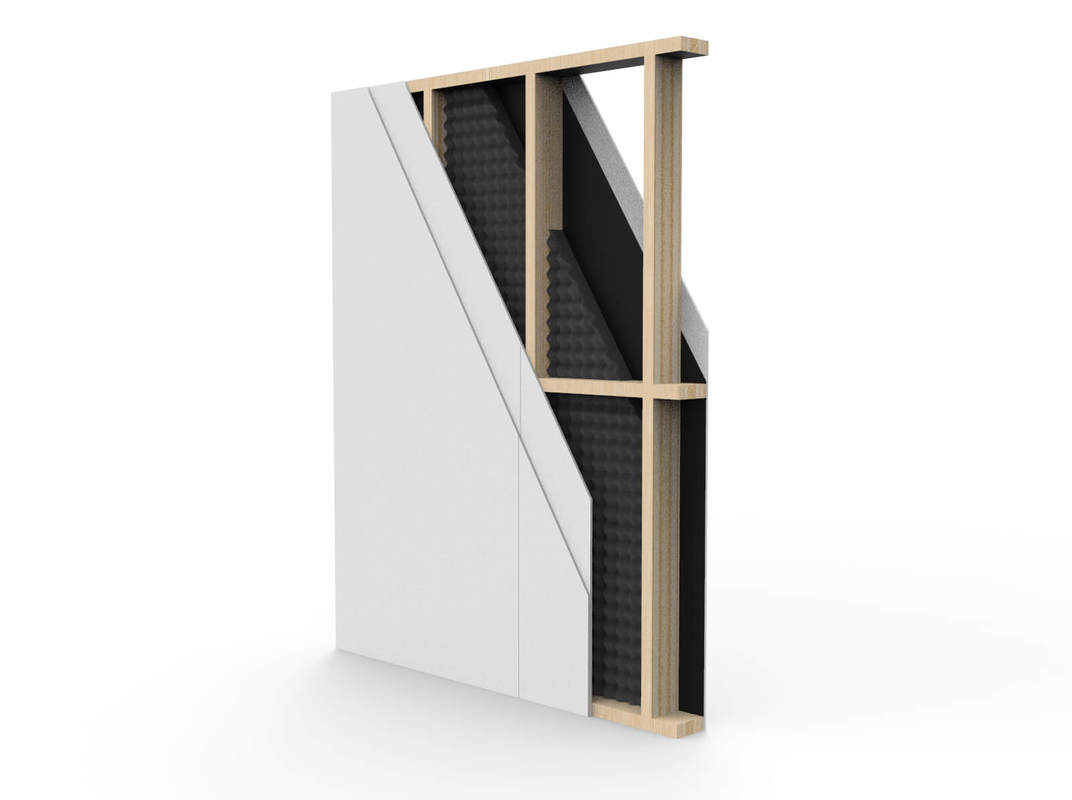
Another important method of soundproofing is to create a floating wall construction by building a separate stud frame that is separated from the existing wall. Having an air gap between the two walls minimizes the transmission of vibrations and structure-borne noise. An air gap of at least 50 mm is recommended, but for more advanced sound insulation of interior walls, for example in studios, the distance can be increased to 150–300 mm. To further optimize the effect, SilentDirect Egg can be used inside the construction to absorb sound waves.

When soundproofing a wall, it is also important to prevent sound leakage through small gaps and joints. Sound can pass through even the smallest gaps, so using acoustic seals such as SilentDirect Seal around door frames, electrical outlets, and other penetrations is crucial. Sealing with elastic joint compounds helps to create a comprehensive sound barrier and prevents sound from propagating through the wall.

To further improve sound insulation, vibration-damping suspension systems can be used to mount the wall. By separating the wall from the building frame using SilentDirect vibration-damping brackets or rails, the possibility of sound being transmitted through the structure is reduced. This is particularly effective in homes with thin walls or in buildings where structure-borne noise is a common problem.

In summary, effective sound insulation of a wall requires a combination of dense and heavy materials, air gaps to break the path of sound, and careful sealing of all penetrations and joints. By using a combination of plasterboard, sound barriers such as MLV, sound-absorbing materials, and vibration-damping solutions, you can retrofit an interior wall and create a significantly more soundproof wall. Adapting the method to the needs and use of the room is the key to achieving optimal sound insulation.

Recommended products

Here are some advantages of soundproofing a wall

Reduced sound transmission
One of the most obvious benefits is that sound insulation helps reduce sound transmission between rooms. This is especially important in homes where you want to reduce sound from one room to another, such as between bedrooms and living rooms.

Increased privacy
Sound insulation can help create more privacy by reducing the risk of sound from one room reaching other parts of the home. This can be particularly useful in multi-family homes or if you have guests and want to avoid disturbing noises.

Improved working environment
If you use a room as an office or workplace, soundproofing can reduce distractions from surrounding noise and improve the overall working environment.

Better acoustics
Soundproofing can also help improve the acoustics of a room by minimizing reverberation and unwanted sound reflections. This can be especially important in rooms where sound quality is important, such as home theaters or recording studios.

Improved sleep quality
When used in the bedroom, soundproofing can help create a quieter and more peaceful sleeping environment, which can improve sleep quality.

Protection from external noise
Sound insulation can also help minimize noise from the outdoor environment, such as traffic noise or neighbor activities, creating a more peaceful indoor environment.

Improved focus and concentration
Reduced noise levels can create a better environment for concentration and focus, which is especially important in educational or work environments.

Option 1 - In our opinion, the best way to soundproof a wall or surface.


Before you begin

Before you start soundproofing a wall or surface, carefully inspect the existing wall or surface to be soundproofed and seal any cracks, joints, or seams where sound can penetrate. Use sealant or joint filler that is suitable for the specific surface. It is important to note that a completely soundproof wall is difficult to achieve, but by combining different methods, you can significantly reduce sound transmission and create a more soundproof and sound-absorbing environment.

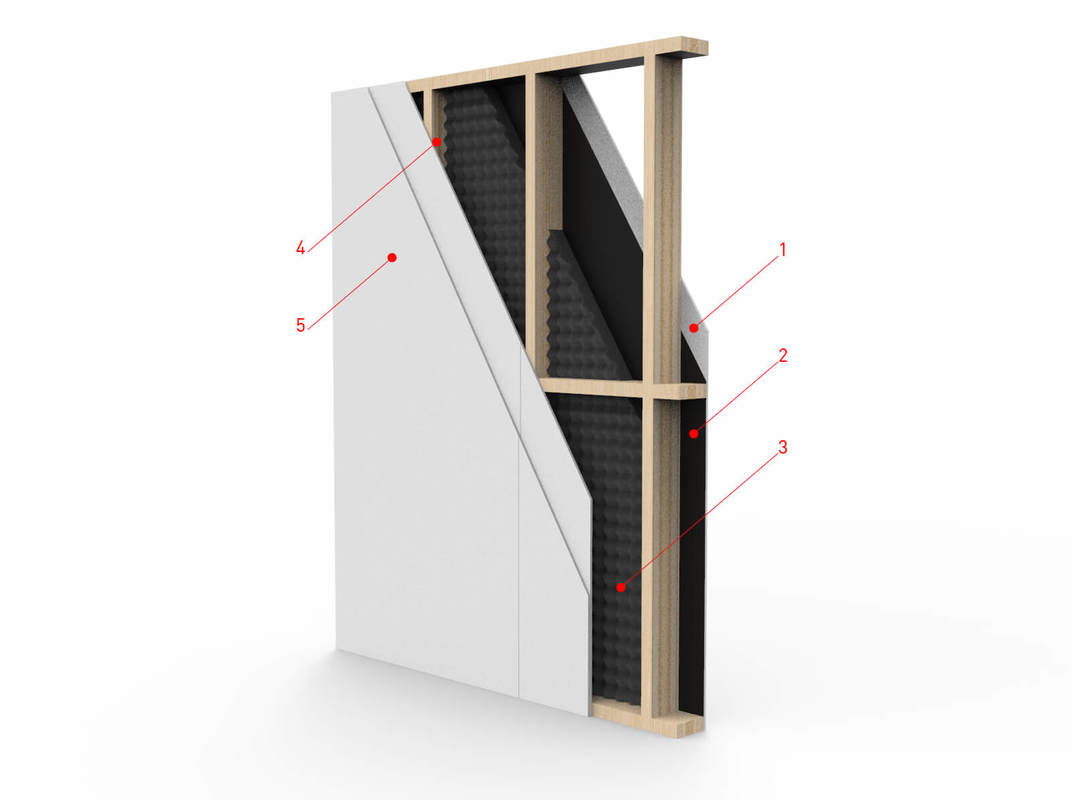
1.existing wall/surface
2. SilentDirect Polaric damping mat or SilentDirect MLV
3. SilentDirect Neo 
4. Studs - SilentDirect Egg - Air gap
5. New wall

Step 1

First, install the SilentDirect Polaric damping mat or SilentDirect MLV (number 2) over the entire existing wall or surface to be soundproofed. It is important to seal all joints with a suitable material, such as sealant, to ensure that the joints are completely sealed. You can use mounting adhesive, which often also seals the joints, to ensure a tight fit. Otherwise, we recommend sealing all joints with our SilentDirect Seal sealing strip, which is usually 25-50 mm wide and 2 mm thick.

It is important to allow SilentDirect Polaric/MLV to extend outwards towards the ceiling, side walls, and floor by approximately 2-3 cm to avoid the risk of leaks on other surfaces around the area to be sealed and soundproofed. SilentDirect Polaric soundproofing mat is very flexible in shape. The mat is heavy, which means that it needs to be securely fastened to sit stably on the surface to be sealed and soundproofed. You can use a standard staple gun, screws, mounting adhesive, or similar fasteners for best results.

Tip 1: for walls that are difficult to work with:
If the wall you want to soundproof is made of materials such as plaster, concrete, or other materials that are difficult to screw or staple into, we recommend that you first install a wooden board. Use OSB, plywood, chipboard, or another wood material, for example. This creates a stable base to which you can easily attach SilentDirect Polaric or SilentDirect MLV using a staple gun or other tools.

Tip 2: Install Polaric/MLV in a different location:
It does not matter where you attach SilentDirect Polaric or SilentDirect MLV in the wall construction. For example, if you want to attach it to the studs before attaching the drywall or drywall sheets, that is fine. You can also attach it between your double drywall sheets, the important thing is that it is 100% tight between other walls, ceilings, and floors.

Step 2

After this, cover the entire wall with SilentDirect Neo 4mm or 7mm thick (number 3) on top of SilentDirect Polaric or MLV. This is done so that the studs to be installed in step 3 do not touch the existing wall or surface to be soundproofed. Allow SilentDirect Neo to extend towards the ceiling, side walls, and floor around the perimeter by at least the same length as the studs are wide, so that the studs do not touch the ceiling, side walls, and floor, but instead stand directly on SilentDirect Neo, thereby further reducing sound transmission in the form of vibrations = Better sound insulation!

Budget tip:
Another option is to skip SilentDirect Neo 4mm or 7mm and install SilentDirect Seal on the back, top, and bottom of each stud that will be mounted against the existing wall or surface to be soundproofed.

Step

Now it's time to install the studs (number 4) on the existing wall or surface you want to soundproof. The studs should be deep enough to extend at least 5 cm from SilentDirect Neo or SilentDirect Egg, depending on which soundproofing product you have used. This will create an air gap of approximately 5 cm between the sound insulation and the new wall (number 5). Once the studs are installed, place SilentDirect Egg or Neo between the studs. We recommend installing at least two boards to form the new wall or surface, first one OSB board and then one plasterboard. It is easier to screw in an OSB board, and it is also good from a sound insulation point of view when working with several different materials, as it will simply be a little quieter. The reason you don't want the studs to touch the existing wall or surface is that the studs and the existing wall will then transfer vibrations to each other, which will result in poorer sound insulation. By preventing this, there will be much less impact from sound vibrations = much better sound insulation!

Tip 1:
One tip is to install SilentDirect Seal sealing strips on the front of each stud before installing the OSB/plasterboard to further reduce the vibrations from the new wall being transferred to the existing old wall.

Tip 2:
One tip is to fill the air gap with sound-absorbing material, such as glass wool or rock wool, before installing the OSB/plasterboard, but not cellular plastic as this does not absorb sound. You can even put in one or more used mattresses, as their only purpose is to absorb the sound entering the air gap. As long as it is a good porous and sound-absorbing material, you can use pretty much anything.

Step 4

Now that the new wall is up, it's time to make sure it's properly sealed all around. It's a good idea to use some kind of sealant or sealing compound. Construction adhesive also works; most construction adhesives are designed for both gluing and sealing.

Done! Enjoy the silence!

Option 2 - Soundproofing a wall without studs.

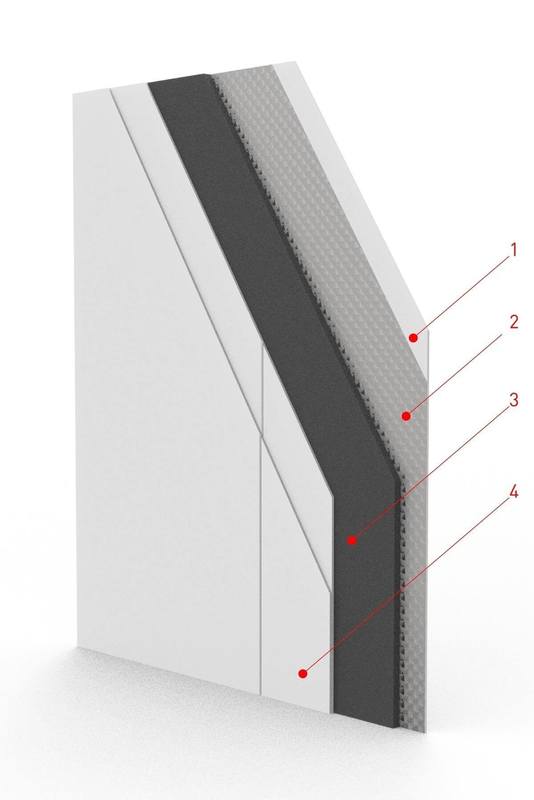
1. Existing wall/surface
2. SilentDirect Polaric damping mat or SilentDirect MLV
3. SilentDirect Neo 
4. New wall

Step

First, install the SilentDirect Polaric damping mat or SilentDirect MLV (number 2) over the entire existing wall or surface to be soundproofednbsp;It is important to seal all joints with a suitable material, such as sealant, to ensure that the joints are completely sealed. You can use mounting adhesive, which often also seals the joints, to ensure a tight fit. Otherwise, we recommend sealing all joints with our SilentDirect Seal sealing strip, which is usually 25-50 mm wide and 2 mm thick.

It is important to allow SilentDirect Polaric to extend approximately 2-3 cm onto the ceiling, side walls, and floor around the perimeter to avoid the risk of leaks on other surfaces around the area to be sealed and soundproofed. SilentDirect Polaric soundproofing mat and MLV are very flexible in shape. The mat is very heavy, so you will need to attach it using a standard staple gun, screws, standard mounting adhesive, or similar, to ensure that it sits securely on the surface you are sealing and soundproofing.

Step 2

After this, cover the entire wall with SilentDirect Neo (number 3) on top of SilentDirect Polaric. You decide the thickness of SilentDirect Neo based on how much depth you have to build out the wall; we recommend as thick as possible.

Step

Now it's time to install the new wall (number 4). The new wall needs to be screwed through all the material and into the existing wall or surface you are soundproofing. Our tip is to install at least two boards to form the new wall or surface, first one OSB board and then one plasterboard. It is easier to screw into an OSB board, and it is also good from a soundproofing perspective when working with several different materials, as it will simply be a little quieter.

The reason you don't want the new wall to touch the existing wall or surface is that the new wall and the existing wall will then transfer vibrations to each other, which will result in poorer soundproofing. By preventing this, there will be much less impact from the vibrations of the sound = much better soundproofing!

Step 4

Now that the new wall is up, it's time to make sure to seal around the entire new wall. It is advisable to use some form of sealant or sealing compound, as it may also be called. Assembly glue also works; most assembly glues are used for both gluing and sealing.

Done! Enjoy the silence!

Option 3 - Budget option

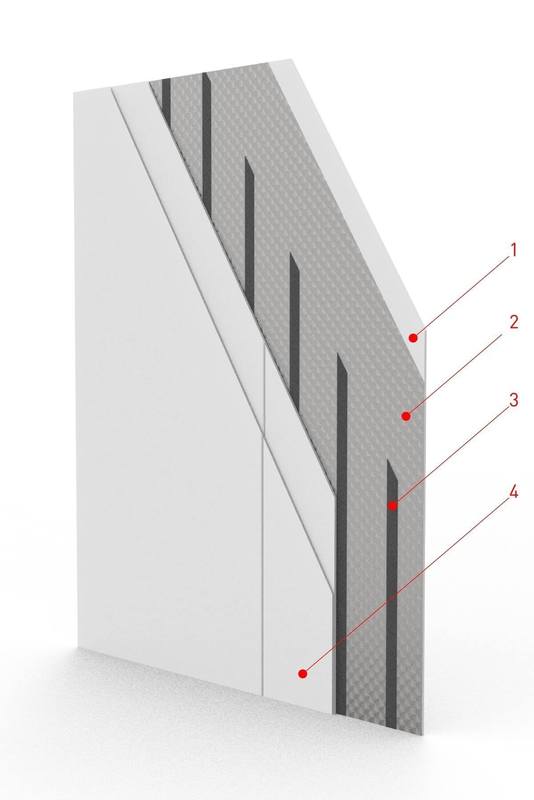
1. Existing wall/surface
2. SilentDirect Polaric soundproofing mat or SilentDirect MLV
3. SilentDirect Seal
4.new wall

Step 1

First, install the SilentDirect Polaric damping mat or MLV (number 2) over the entire existing wall or surface to be soundproofed. It is important to seal all joints with a suitable material, such as sealing compound, to ensure that the joints are completely sealed. We recommend sealing all joints with our SilentDirect Seal sealing strip, which is usually 25-50 mm wide and 2 mm thick.

It is important to allow SilentDirect Polaric to extend out towards the ceiling, side walls, and floor around the perimeter by approximately 2-3 cm to avoid the risk of leaks on other surfaces around the area to be sealed and soundproofed. SilentDirect Polaric soundproofing mat and MLV are very flexible in shape. The mat is very heavy, so you will need to attach it using a standard staple gun, screws, standard mounting adhesive, or similar, to ensure that it sits securely on the surface you are sealing and soundproofing.

Step 2

After this, attach SilentDirect Seal (number 3) on top of SilentDirect Polaric all the way from the bottom to the top of the ceiling. You can choose for yourself, but we recommend that you leave a maximum of about 20-30 cm between each strip of sealing strip on the wall. We recommend using 50 mm wide and 4 mm thick SilentDirect Seal. This is done so that the new wall to be installed in step 3 does not touch the existing wall or surface to be soundproofed.

Step 3

Now it's time to install the new wall (number 4). The new wall needs to be screwed through all the material and into the existing wall or surface you are soundproofing. Our tip is to install at least two boards to form the new wall or surface, first one OSB board and then one plasterboard. It is easier to screw in an OSB board, and it is also good from a soundproofing perspective when working with several different materials, as it will simply be a little quieter.

The reason you don't want the new wall to touch the existing wall or surface is that the new wall and the existing wall will then transfer vibrations to each other, which will result in poorer soundproofing. By preventing this, there will be much less impact from the vibrations of the sound = much better soundproofing!

Step 4

Now that the new wall is up, it's time to make sure to seal around the entire new wall. It is advisable to use some form of sealant or sealing compound, as it may also be called. Construction adhesive also works; most construction adhesives are used for both gluing and sealing.

Done! Enjoy the silence!

Did you know that..

A wall can look solid but still let sound through almost as easily as a thin sheet of plywood. Many people think that thickness is everything, but what really affects sound insulation is the combination of mass, damping, and decoupling. A single incorrectly installed plasterboard panel can cause sound waves to travel through the entire structure – and suddenly the wall you thought was soundproofed is an acoustic shortcut for noise!

An air gap can both help and hinder sound insulation. If the gap is too large and lacks damping material, it can act as a resonance box and amplify certain frequencies. But if it is filled with SilentDirect Egg or similar porous sound absorbers, it can capture sound waves and prevent them from bouncing further.

Sound can travel through screws and studs! If the wall is fixed to the building frame, vibrations can still spread through the connection points. By using vibration-damping fasteners or building a floating wall construction, where the new wall is decoupled from the old one, you can eliminate this sound bridge and drastically improve sound insulation. We recommend SilentDirect Seal as a vibration-damping material.

So next time you think about soundproofing a wall, remember that it's not just about making it thicker, but about breaking the sound path. The right materials and construction can make the difference between an ordinary wall and a real sound barrier!

Products that are good for soundproofing and sound dampening a wall

To effectively soundproof a wall, you need the right materials that can block and dampen sound transmission. Soundproofing is about preventing sound from penetrating the wall, which can be achieved by combining heavy, dense materials and vibration-damping solutions. Here are the best products for soundproofing a wall.

SilentDirect Polaric damping mat
SilentDirect Polaric is a heavy damping mat made of butyl mix with a durable aluminum surface. It is designed to effectively absorb vibrations and minimize sound transmission through walls. Installing SilentDirect Polaric on a wall creates a dense sound barrier that prevents sound waves from propagating. It works particularly well in combination with other sound-insulating materials and can be attached directly to wall surfaces to reduce both airborne and structure-borne sound.

SilentDirect MLV
SilentDirect MLV (Mass Loaded Vinyl) is a flexible and heavy sound-insulating mat that blocks sound transmission through walls. Its high density makes it one of the most effective solutions for reducing both airborne and structure-borne sound. Installing SilentDirect MLV between two sheets of drywall or behind panel walls creates an effective sound barrier. It can be easily cut to size and adapted to the dimensions of the wall, making it an optimal choice for reducing sound leakage between rooms.

SilentDirect Egg
SilentDirect Egg is a high-performance sound absorber made of NBR rubber (nitrile rubber). Its unique egg-shaped design breaks up sound waves and reduces sound reflections, making it ideal for absorbing sound energy and reducing sound transmission through a wall. SilentDirect Egg is installed between the studs in a wall construction to optimize sound absorption and reduce sound transmission. It is an effective solution for creating a quieter environment by reducing resonance and improving sound insulation.

SilentDirect Neo
SilentDirect Neo is a flat sound-absorbing product made from the same highly absorbent NBR rubber as SilentDirect Egg. The product is designed to be installed between two surfaces to reduce vibration and sound transmission through a wall. Its flat design makes it particularly effective at dampening resonance in wall constructions, which improves sound insulation. SilentDirect Neo is used where low-profile sound dampening is required and works well in combination with other sound-insulating materials.

SilentDirect Seal
SilentDirect Seal is a flexible sealing strip made of durable nitrile rubber (NBR) that effectively prevents sound leakage and dampens vibrations in a wall construction. The sealing strip is used to seal joints, penetrations, and door gaps in a wall, preventing sound from penetrating. By eliminating sound leakage, the overall sound insulation of the wall is improved, contributing to a quieter environment.

*Free shipping

Free shipping to agent

5-year warranty

5-year product warranty

Fast delivery

Usually ships the same day

How to soundproof a wall – The solution to disturbing noise

Soundproofing walls is an effective method for reducing sound transmission between rooms and creating a quieter, more comfortable environment. Whether it's homes, offices, or other spaces where noise levels affect comfort and function, there are solutions that make a difference. The right methods and materials are crucial for achieving optimal soundproofing – and for solving your acoustic challenges.

What does soundproofing walls involve?

Soundproofing a wall means preventing sound from penetrating from one side to the other. This is done by breaking the sound's path using heavier materials, creating air gaps that dampen sound waves, and using sound-absorbing products such as acoustic foam or mineral wool. This combination of techniques effectively blocks both high and low frequencies, making it a solution for all types of sound problems.

Problems that soundproofing solves

Disturbing noise can affect everything from work environments to home comfort. Here are some examples of how sound insulation can improve everyday life:

Reduced sound transmission
Reduce sound between rooms, which is especially important in homes with thin walls or multi-family dwellings.

Increased privacy
Prevent private conversations or activities from spreading to other parts of the home.

Better acoustics
Reduce echoes and sound reflections, especially in rooms such as studios or home theater systems.

Improved working environment
Create a quiet workplace free from distractions, whether it's a home office or a commercial work environment.

Protection from external noise
Block out traffic noise, neighbor activities, or other external disturbances.

Improved sleep quality
Soundproof walls can create a peaceful bedroom environment, free from unwanted noise.

Why is soundproofing important in different environments?

Noise problems occur in many different environments, and soundproofing walls is a versatile solution. Here are a few examples:

Home
Soundproofing provides peace and quiet in bedrooms, living rooms, and home theaters.

Office
Improve concentration and reduce background noise in open-plan offices or meeting rooms.

Restaurants and hotels
Increase guest comfort by minimizing disruptive noise between rooms or dining areas.

Studios and cinemas
Create an optimal acoustic environment for recording or entertainment.

Public spaces
Improve the sound environment in schools, libraries, and healthcare facilities where noise can affect well-being.

How our solutions work

We offer products that are designed to deliver maximum results in sound insulation. Our materials are not only high-performing but also aesthetically pleasing and durable. Whether you want to reduce noise levels in your home or optimize the acoustics in your workplace, we can offer solutions that match your needs. The products are easy to install and designed to fit into all types of spaces, from modern homes to industrial environments.

Take the step towards a quieter environment

Soundproofing walls is key to creating a more pleasant and functional environment, where disturbing noises are no longer a problem. Explore our products and solutions to find the right option for your needs. By choosing our sound-absorbing and soundproofing materials, you get a long-term and effective solution for a quieter everyday life.